Taskmap
 poanse3k downloads
Plan projects via interactive GUI task trees with automatic layout.
- Overview
- Scorecard
- Updates23
Plan projects as visual task trees in Obsidian. Taskmap lays out the tree automatically, so you never have to drag boxes around to keep it readable.
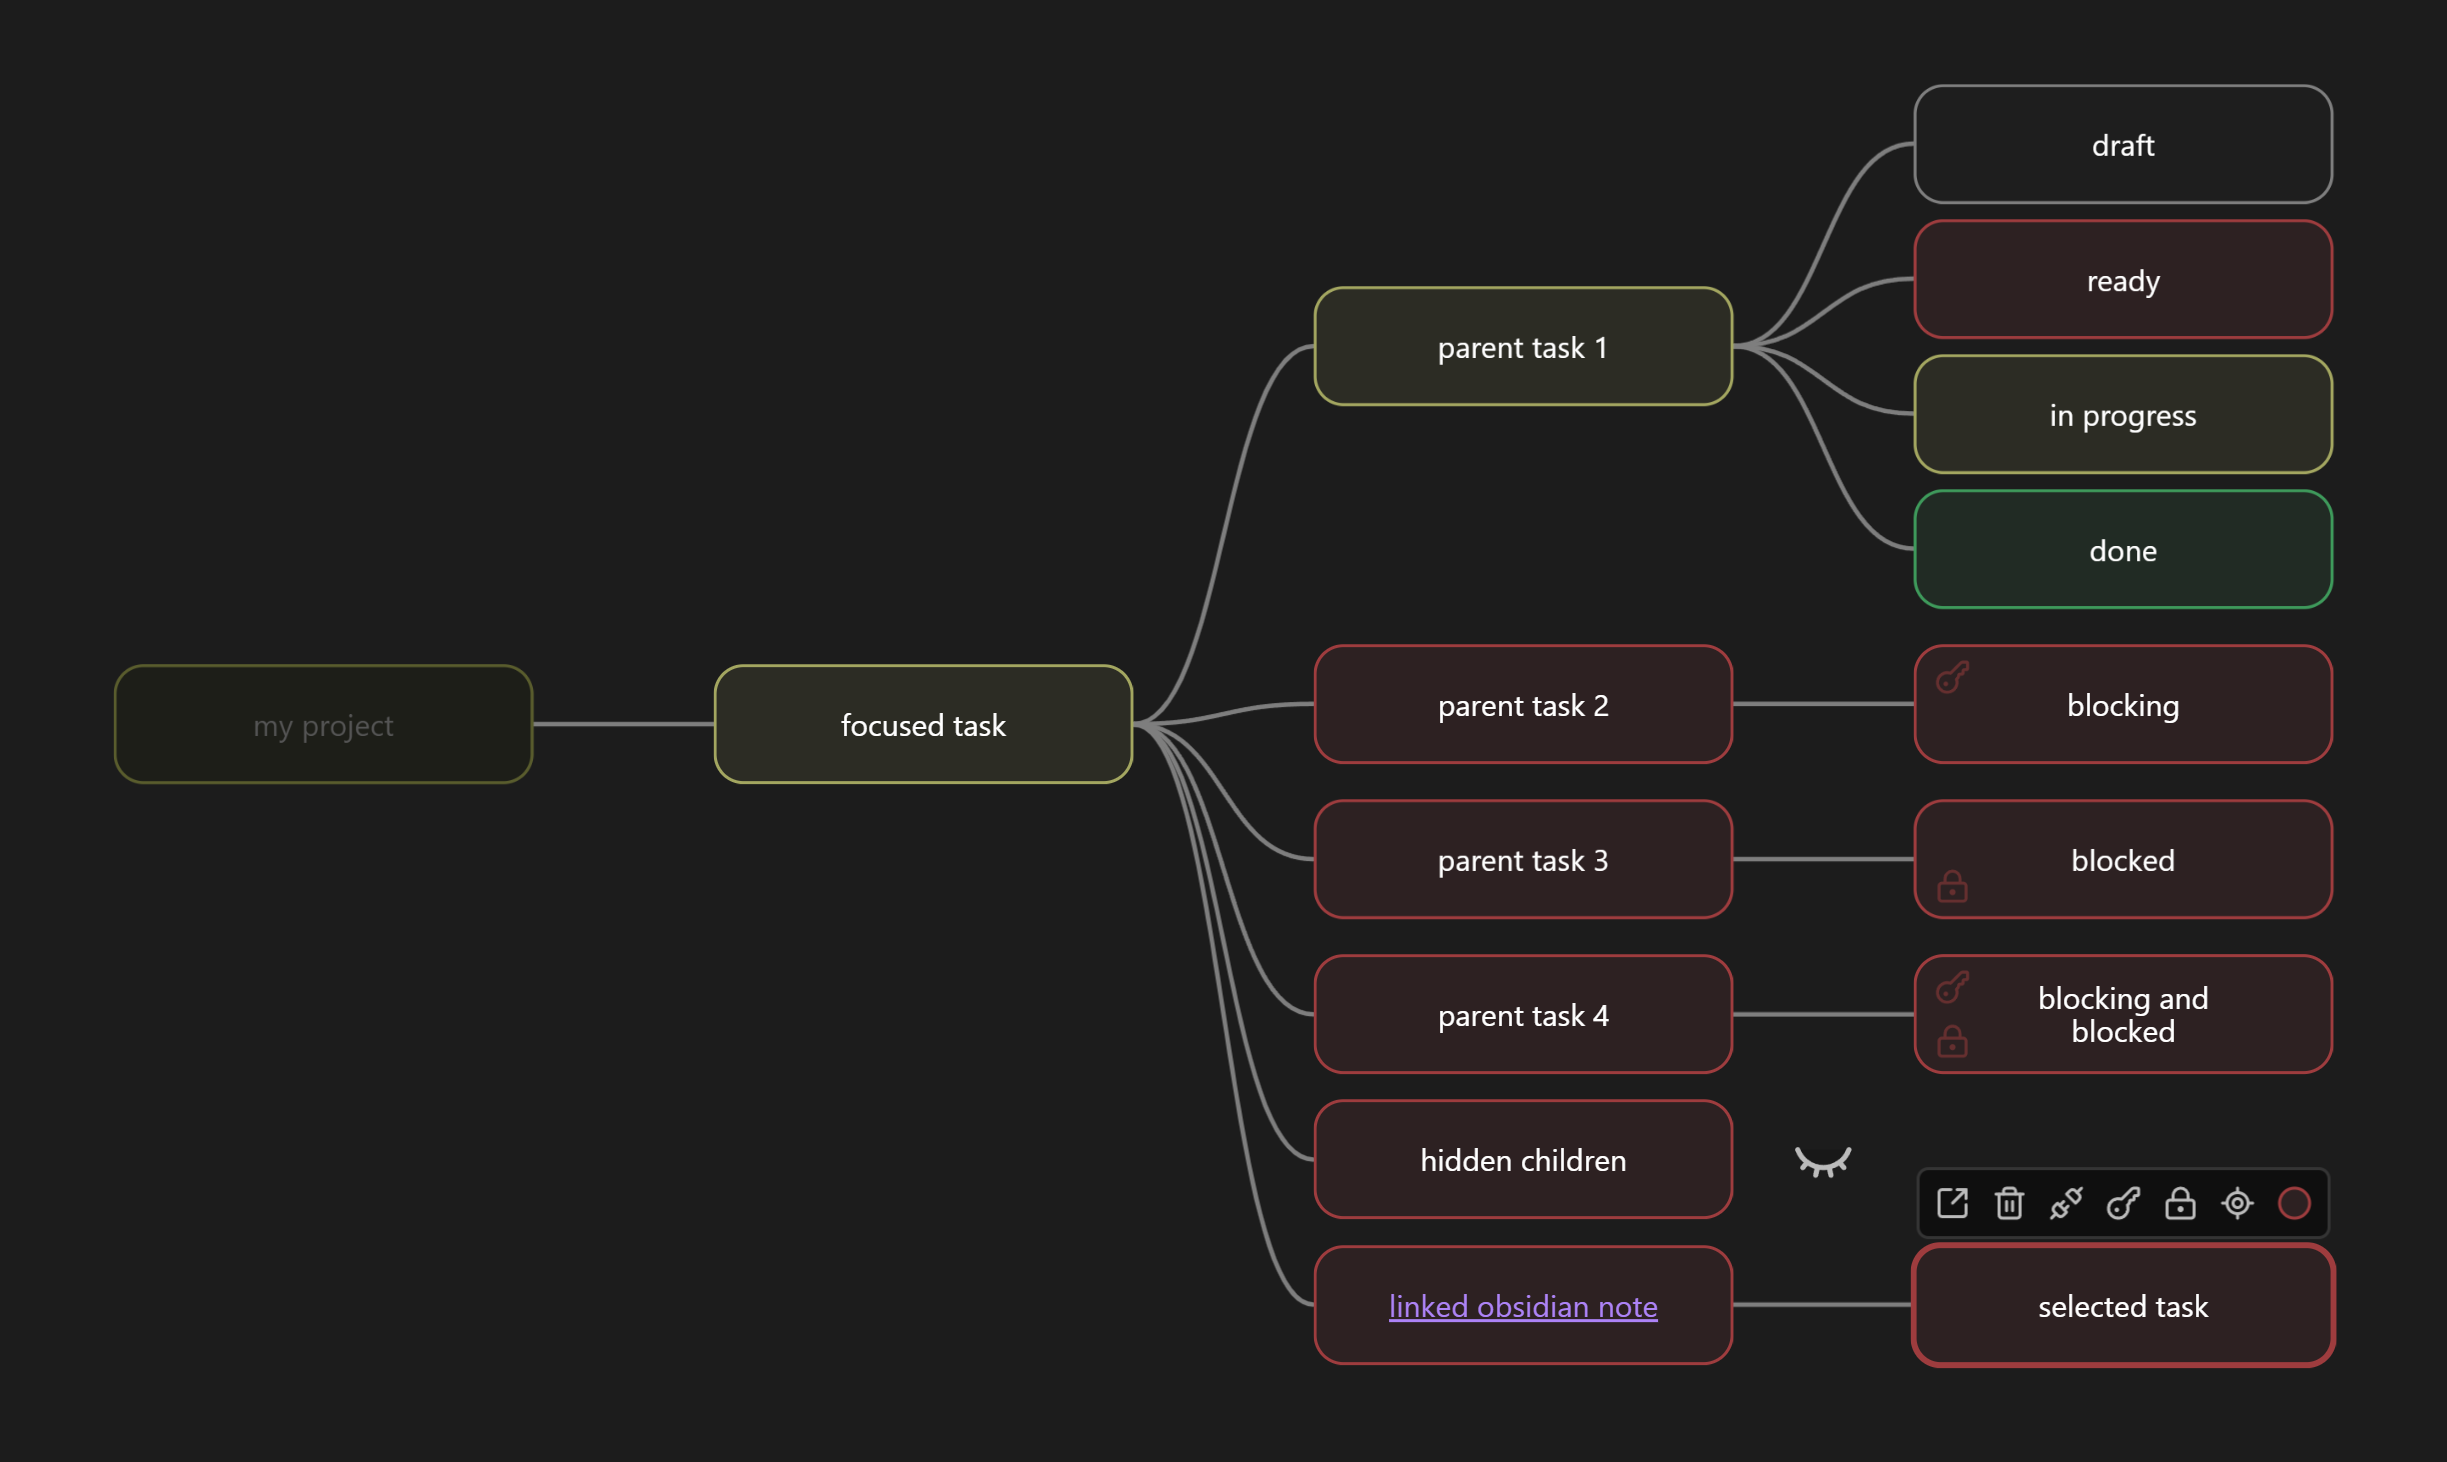
Draft is gray, Ready is red, In progress is yellow, and Done is green.
Why Taskmap?
Large Kanban boards get hard to read. Taskmap shows your project as a color-coded tree, so you can see at a glance:
- Which tasks are done, in progress, or ready to start
- Which tasks are blocked, and by what
- How the work breaks down from goals into subtasks
How to install
Install Taskmap from its Obsidian plugin page, or open Settings → Community plugins → Browse in Obsidian and search for Taskmap.
Obsidian Sync skips .taskmap files by default. To sync them, turn on Sync all other types in Settings → Sync on each device.
How to use
- Click the Taskmap ribbon icon or run Taskmap: Create new map from the command palette to create a map in the vault root. To create one in a specific folder, right-click the folder in the file explorer and click New taskmap. The map is named like
Example_26-10-10_03.44.12.taskmap, with_1,_2, and so on added if that name is taken, and opens in a new tab. - Hover a task and click + to add a child. The new task is named
taskand starts as Ready. - Select a task to open its toolbar. Hover a toolbar button to see its name.
- Select a task, then click its name to rename it.
- Drag a task to reorder it among its siblings.
- Hover a task and click the eye icon to hide its children.
Feature reference
Root task
Every map starts with a task named root, with status Draft. Like any parent set to Draft, it stays a draft after you add children, until you click its calculated status in its Status menu. Rename it to your project's name. The root can't be reparented, removed, or used as a blocker.
Rename a task
Select a task, then click its name. Click somewhere else to apply the name. This works the same way for every task, including the root.
Long names wrap, and the box grows with the text. The tree lays itself out again to fit.
Reorder tasks
Drag a task up or down to change its place among the other tasks under the same parent. The task stays under that parent, and its children move with it. The root can't be dragged.
As you drag, the other tasks shift to make room. Release the mouse button to leave the task in its new place.
Hide tasks
Hover a task and click the eye icon to collapse its descendants. Hidden tasks stay in the file; click the eye icon again to show them.
Pan and zoom
Drag an empty area of the map with the left or middle mouse button to pan. Swipe with two fingers on a trackpad to pan. Scroll the mouse wheel, or pinch on a trackpad, to zoom. Zoom ranges from 10% to 300%. You can also zoom with the buttons in the settings panel.
Task toolbar
Select a task to open its toolbar. From left to right, it has Add link, Remove, Reparent, Add blocker task, Block another task, Focus, and Status. Hover a button to see its name. The root's toolbar has only Add link, Focus, and Status.
Linked notes
Click Add link to create a note named after the task and link the two. If a note with that name already exists, it's linked instead.
New notes go to the project's note folder, then the plugin's default note folder. If neither is set, they follow Obsidian's Default location for new notes setting.
To link an existing note, type [[ in the task name and choose a note from the suggestions. Typing [[Meeting notes]] renames the task to that note and links it.
Click the link while the task is not selected to open or focus the note. Hover the link to show Obsidian's link preview. If the task is already selected, clicking its name starts editing, and the link is not followed.
Once a task is linked to a note:
- Renaming the note renames the task.
- Moving the note or renaming its folder keeps the link.
- Deleting the note removes the link; the task keeps its name.
- Renaming the task breaks the link; the note is left unchanged.
A task name can also be any Markdown link, such as [Design doc](https://example.com/design).
Remove tasks
Select a task, click Remove in its toolbar, then choose:
- Remove single task removes only the selected task. Its children move up and take its place under its parent.
- Remove task branch removes the selected task and all its descendants.
Move a task to another parent
Select a task, click Reparent, then click the new parent on the map. The task moves with all its children and becomes the last child of the new parent. The new parent can't be the task itself, its current parent, or one of its descendants. Click an empty area to cancel.
Blockers
Select a task, then:
- Click Add blocker task, then click the task that blocks the selected one.
- Click Block another task, then click the task that the selected one blocks.
Click an empty area to cancel.
While Add blocker task or Block another task is active, click a task that is already connected to remove that connection. A task can't be connected to itself, to an ancestor, to a descendant, or to a task that is Done.
A blocked task cannot be marked done until all its blockers are done. A key icon marks a task that blocks others, and a lock icon marks a task that is blocked.
Blocker connections are drawn as orange lines. They appear while Add blocker task or Block another task is active, and when you hover a task's icons:
- Hover the key icon to highlight the tasks it blocks.
- Hover the lock icon to highlight the tasks that block it.
Focus
Click Focus to work on one task and its subtree without distractions. Everything else is hidden for a while, except the chain of parents that leads from the task up to the root. Click Focus again to bring back the full map.
Statuses
Each task has one of four statuses: Draft, Ready, In progress, or Done. The colors are listed under the screenshot.
To change a status, select the task, then click Status in its toolbar and choose a status.
Leaf tasks (tasks without children) can be set to any status. A parent task's status is calculated from its children:
- Done if all children are done
- In progress if at least one child is done or in progress
- Ready otherwise, including when all children are drafts
A parent's Status menu offers only Draft and its calculated status. A task you set to Draft stays a draft whatever its children do, until you click its calculated status.
Settings panel
The settings panel sits in the bottom-left corner of the map. From left to right, it has Settings; Undo and Redo; Zoom in, Reset zoom, and Zoom out; and Keyboard shortcuts. Hover a button to see its name.
Project settings
Click Settings to open the current map's settings:
- Note folder: where new linked notes for this map go. It overrides the plugin's default note folder.
- Layout:
- Tree (default): the root's children sit in one column to the right of the root.
- Double row: the root's children alternate between a row above the root and a row below it. Use it when the root has many children and one column gets too tall.
- Compact layout (on by default): reduces empty space between tasks.
Undo and redo
Click Undo or Redo. Undo history is cleared when you close the file.
Zoom
- Zoom in zooms in by one step. Zoom sensitivity (keyboard) in plugin settings sets the step size.
- Reset zoom returns the map to 100%.
- Zoom out zooms out by one step.
Keyboard shortcuts
Click Keyboard shortcuts to see the map's keyboard shortcuts.
Plugin settings
Plugin settings are in Settings → Taskmap:
- Theme: Obsidian (default) uses the active Obsidian theme's red, yellow, and green, and its faint text color for drafts, so community themes can change the exact shades. Light and Dark force Taskmap's own light and dark shades.
- Zoom sensitivity, set separately for mouse, touchpad, and keyboard. Keyboard sensitivity also applies to the zoom buttons
- Reverse two-finger pan (on by default): moves the map opposite to your fingers when you swipe on a touchpad
- Default folder for linked notes. A map's project settings can override it.
Files
A .taskmap file is JSON stored in the vault. Rename or move it in the file explorer; an open map follows the file.
Obsidian Sync skips .taskmap files unless Sync all other types is turned on in Settings → Sync.
Current limitations
- Works only in the Obsidian desktop app.
- Has no sharing or collaboration features.
- Tasks have no due dates or assignees.
- Tasks are stored only in the
.taskmapfile and don't sync with Markdown checkboxes or task plugins. - The interface is available only in English.
Bugs and missing features
- Text view for .taskmap files
- Obsidian sync support
- Documentation is incomplete. Some behavior isn't described here yet. If something is unclear, open an issue.
- Multi-select. You can select only one task at a time. Selecting several tasks by dragging a box around them with the left mouse button is planned.
- Plugin mobile support. Taskmap works only in the desktop app. Support for Obsidian on phones and tablets is planned.
- Standalone website. Taskmap projects can only be viewed and edited in Obsidian. A website where you can work on them without Obsidian and share them with others via a link is planned.
Contributions
Blocker UX and most of the UI were designed by Mulcere.
Development
Clone the repository into your vault's .obsidian/plugins/ folder, then install dependencies and start the watcher:
npm install
npm run dev
Enable Taskmap in Settings → Community plugins, and reload Obsidian after each rebuild to load the changes.
Other commands:
npm run build
npm test
npm run lint
npm run perf:tasks
npm run dev rebuilds the plugin as you edit. npm run build writes a production main.js. npm test runs the tests. npm run lint runs the linter. npm run perf:tasks benchmarks task lookup and layout.