Vault Shell
 Nhat Duy Mai73 downloads
Open an interactive terminal inside your Obsidian workspace.
- Overview
- Scorecard
- Updates7
An interactive terminal that runs inside your Obsidian workspace.
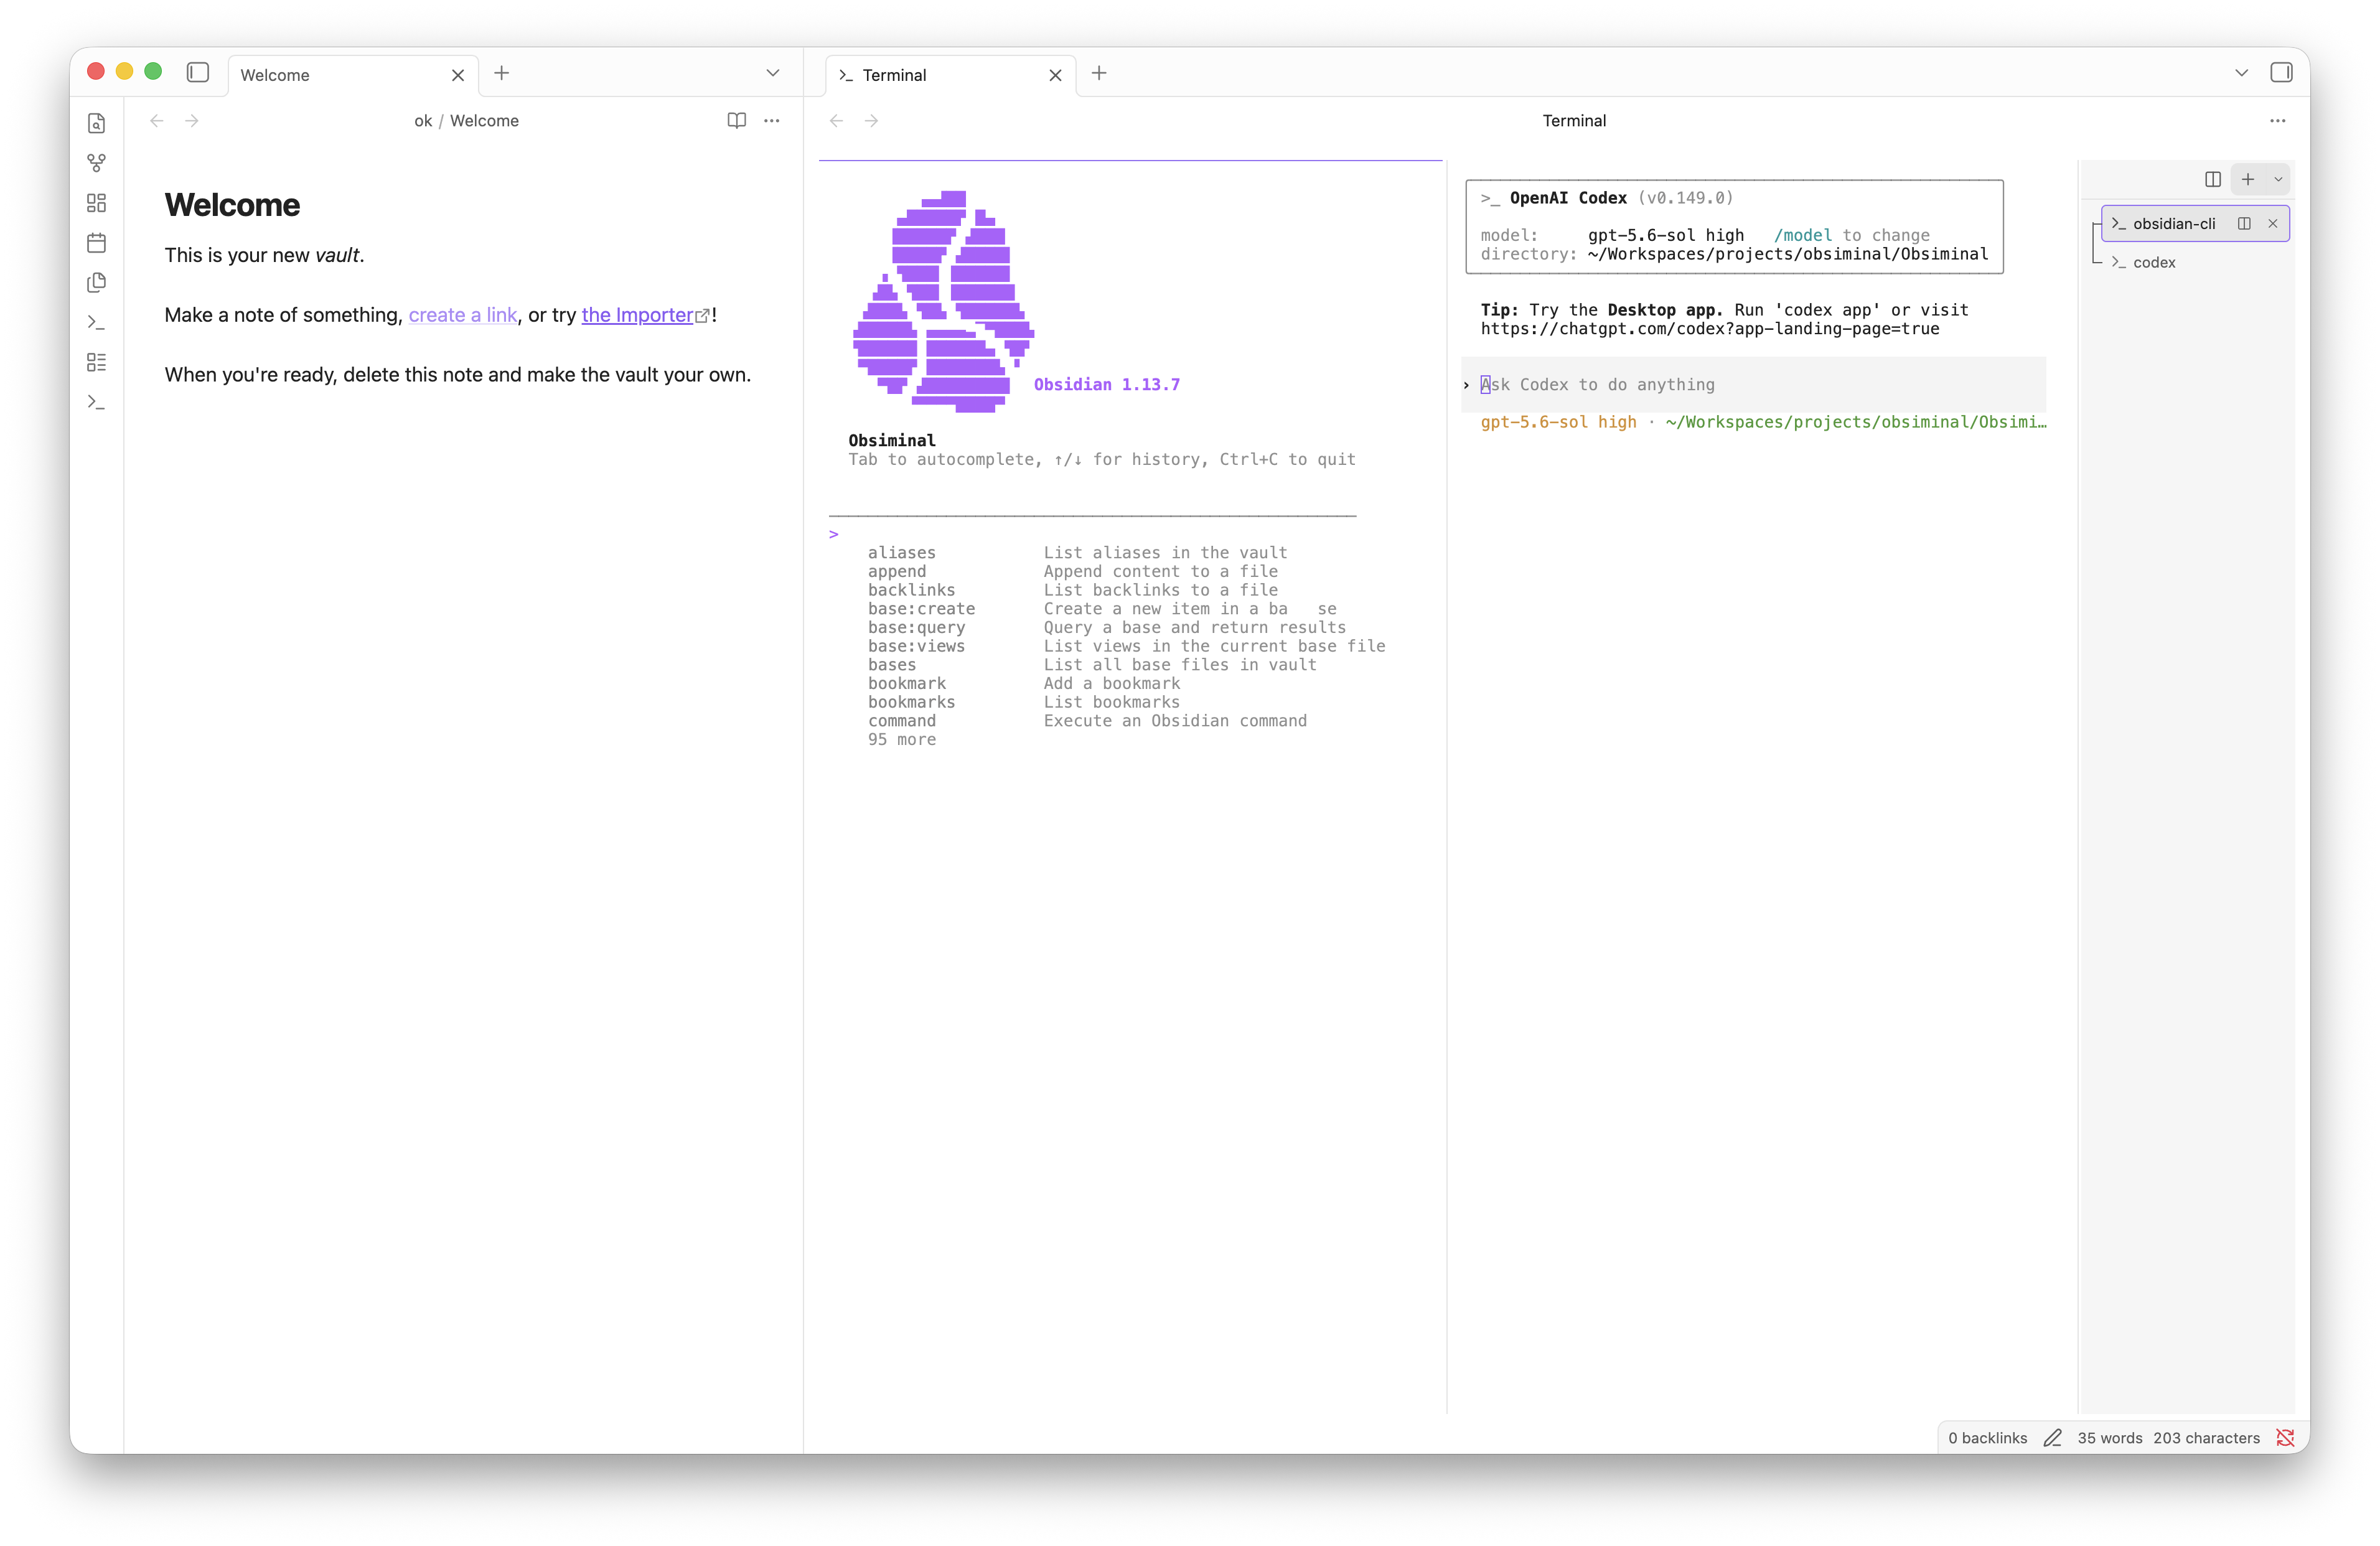
Vault Shell opens a real PTY-backed shell in a standard Obsidian pane. Dock it beside your notes, move it to the bottom of the workspace, or keep it as a tab wherever it fits your workflow.
[!IMPORTANT] Vault Shell 0.3.0 supports the Obsidian desktop app on macOS, Windows, and glibc-based Linux. It does not support Obsidian Mobile or musl-based distributions such as Alpine Linux.
Features
- Open or focus the terminal with a ribbon icon or the command palette.
- Start each shell in the root directory of the current vault.
- Discover installed shells from the current environment, system shell lists, and standard installation locations on each operating system.
- Add custom shell profiles with an executable and arguments from the plugin settings.
- Create, switch between, and close multiple terminal sessions from a vertical manager.
- Split terminals side by side in the same group and drag the divider to resize each pane.
- Update each terminal label from its foreground process, then restore the shell name when the command exits.
- Run interactive programs with ANSI colors,
Ctrl+C, terminal resizing, and up to 5,000 lines of scrollback. - Keep sessions running when the terminal pane is closed, then reconnect when it is opened again.
- Follow Obsidian's light or dark theme automatically.
Requirements
| Requirement | Version or details |
|---|---|
| Operating system | macOS, Windows 10 1903 or later, Windows 11, or glibc Linux 2.31+ |
| CPU architecture | x64 or arm64 |
| Obsidian | 1.7.2 or later |
| Vault | Local filesystem vault |
Installation
Install Vault Shell from Settings → Community plugins:
- Turn on community plugins if they are disabled.
- Select Browse, search for Vault Shell, and select Install.
- Select Enable.
No Node.js, npm, compiler, or separate node_modules directory is required. The Community
Plugins installer downloads the standard main.js, manifest.json, and styles.css files.
main.js includes the native PTY runtimes for all supported operating systems and CPU
architectures, then prepares only the matching runtime locally when the first terminal starts.
To install from source in a test vault instead:
cd "/path/to/Your Vault/.obsidian/plugins"
git clone <repository-url> obsiminal
cd obsiminal
npm install
npm run build
The plugin directory must remain named obsiminal. Node.js 24 or later and npm are required
only when building from source.
Usage
Open the terminal in any of the following ways:
- Select the terminal icon in the ribbon.
- Run Vault Shell: Open or focus terminal from the command palette.
Once the terminal is open:
- Drag the Terminal tab to dock it anywhere in the workspace.
- Select + to create a terminal with the default shell.
- Select the arrow beside + to choose another detected shell.
- Select Split terminal on the toolbar to open another shell beside the active one.
- Select a terminal in the right sidebar to switch sessions. Split sessions are shown as a connected group.
- Drag the divider beside the terminal manager to resize the sidebar; double-click it to restore the default width.
- Select × on a terminal row to close that session and terminate its process.
Choose the shell used by the + button under Settings → Vault Shell → Default shell. The automatic option keeps using the first shell detected from the Obsidian environment.
You can assign your preferred shortcut under Settings → Hotkeys.
Custom shells
Vault Shell detects common shells automatically, including cmd, Windows PowerShell,
PowerShell 7, WSL, Git Bash, zsh, bash, fish, Nushell, and others. To add another shell:
- Open Settings → Vault Shell.
- Select Add shell.
- Enter a display name and the absolute path to the executable.
- Enter optional arguments with one argument per line.
For example, create a profile for a specific WSL distribution with the wsl.exe path and the
two arguments -d and Ubuntu on separate lines. Custom profiles remain in settings when the
executable is temporarily unavailable, but they appear in the terminal menu only while valid.
On Linux, if zsh is installed but does not appear in the shell menu, first find its path:
command -v zsh
test -x /usr/bin/zsh && echo "zsh executable: OK"
Then add a custom shell named zsh, use the absolute executable path (commonly
/usr/bin/zsh or /bin/zsh), and enter -l as its only argument. Select that profile under
Default shell or from the arrow beside +. A new session should report a value for
$ZSH_VERSION; existing sessions keep their original shell.
Commands
| Command | Default hotkey | Description |
|---|---|---|
| Vault Shell: Open or focus terminal | None | Opens the terminal pane or focuses the existing one. |
| Vault Shell: New terminal | None | Opens the pane and creates a new terminal session. |
| Vault Shell: Split terminal | None | Splits the active terminal into another pane. |
Security and privacy
Vault Shell does not require an account, collect telemetry, or make network requests on its own.
To discover installed shells, Vault Shell uses the Node.js filesystem API to read
/etc/shells on Unix systems and check shell paths found through environment variables and
standard installation locations. These are read-only checks outside the vault; Vault Shell
does not modify those files.
When the first terminal starts, Vault Shell writes its bundled PTY runtime to the plugin's own
prebuilds directory. It does not download code or dependencies.
The terminal itself runs with the same permissions as Obsidian and launches a real shell at the vault root. Commands entered in that shell can read, change, or delete files anywhere your user account can access, and they may connect to the network. Review commands before running them and use a test vault while evaluating the plugin.
Troubleshooting the PTY runtime
If the terminal reports that pty.node, conpty.node, or a PTY helper cannot be loaded:
- Quit Obsidian completely.
- Delete the
prebuildsdirectory inside<vault>/.obsidian/plugins/obsiminal/. It contains only generated copies of the runtime bundled inmain.js. - Reopen Obsidian and start a terminal so Vault Shell prepares a fresh copy.
If the problem continues, reinstall the plugin from Community Plugins to replace main.js,
then report the full error, operating system, CPU architecture, and Linux distribution when
applicable. Alpine Linux and other musl-based distributions are not supported.
Development
Clone the repository anywhere on your machine, then link it into a test vault:
mkdir -p "/path/to/Test Vault/.obsidian/plugins"
ln -s "/absolute/path/to/obsiminal" "/path/to/Test Vault/.obsidian/plugins/obsiminal"
cd "/absolute/path/to/obsiminal"
npm install
npm run dev
After a source change, run Reload app without saving from Obsidian's command palette. You can also disable and re-enable the plugin.
Node.js 24 or later and npm are required for source builds. Linux source builds also require
Python 3, make, and a C++ compiler because node-pty is compiled locally.
Run the complete quality check before submitting a change:
npm run validate
This command runs ESLint, Prettier checks, tests, TypeScript type checking, and a production build for the current host. The build writes the Obsidian plugin artifacts to the repository root:
main.jsmanifest.jsonstyles.css
Official releases use a six-runner CI matrix to smoke-test and stage macOS, Windows, and Linux
runtimes for x64 and arm64. The release job verifies those native binaries before running
npm run build:universal; no runtime is downloaded by the installed plugin.
Project structure
VaultShellPluginmanages commands, the workspace view, and terminal sessions.TerminalSessionowns the PTY process and its lifecycle.XtermSurfacemanages the xterm.js interface, scrollback, and theme.TerminalViewrenders shell selection and session tabs.
Current limitations
- Linux requires glibc 2.31 or later; musl-based distributions are not supported.
- Windows requires the ConPTY API available in Windows 10 1903 or later.
- Local filesystem vaults only.
- Sessions do not survive an Obsidian restart, reload, or plugin disable.
- Font and working-directory settings are not configurable yet.
Contributing
Bug reports and pull requests are welcome. Before opening a pull request, run
npm run validate and test the plugin in a separate vault.
License
Vault Shell is available under the MIT License. It bundles
node-pty, which is also available under the MIT
License; its license notice is preserved in the generated main.js.