Canvas Branch Chat
 p4nt1um299 downloads
Flowith-style branching AI conversations on Obsidian Canvas. Fork, explore, and map your thinking.
- Overview
- Scorecard
- Updates16
对话即地图,地图即笔记。
Conversation is a map. The map is your notes.
在 Obsidian Canvas 上实现 Flowith 式的分叉对话——从任意节点拉线分叉、标注方向、每个分支独立对话、自动继承上下文,最终自然形成一张可回溯的思维地形图。
Flowith-style branching AI conversations on Obsidian Canvas. Fork from any node, label the direction, and watch your thinking evolve into a navigable map of ideas.
📸 预览 / Screenshots
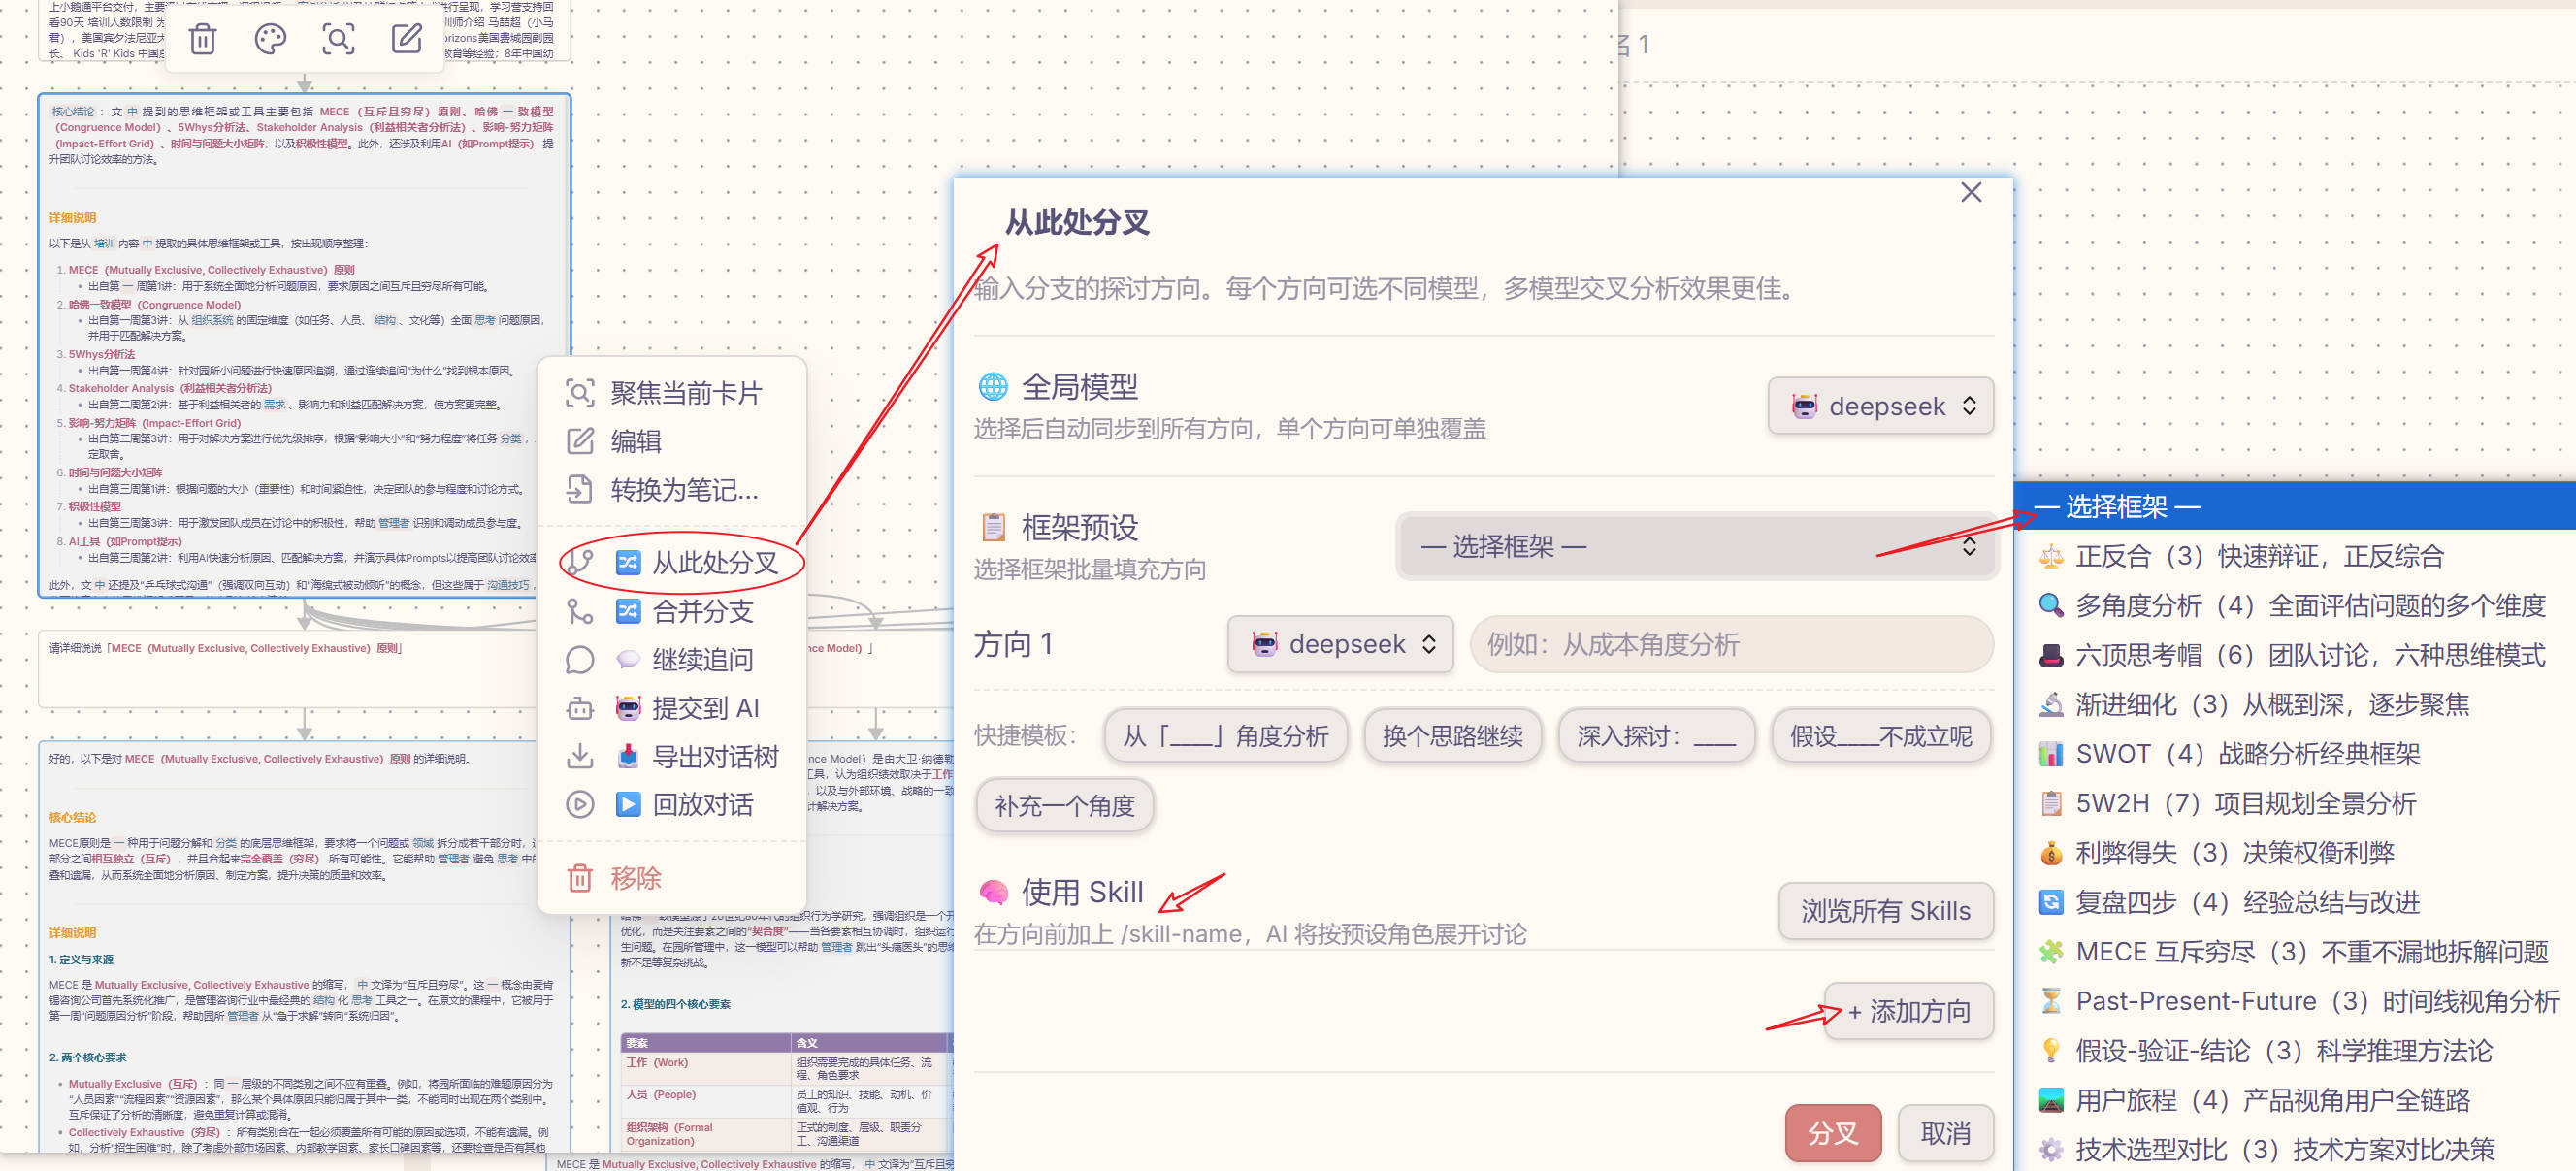
多方向分叉对话 + 框架预设 + 模型选择 — 中文界面
语言设置:跟随系统 / 简体中文 / English
📌 语言 / Language
最新版本: v0.4.0 | 更新: 2026-08-06 | 发布: GitHub Releases
简体中文
这是什么?
这不是"又一个 AI 聊天插件"——Obsidian 已经有 Text Generator、Copilot 等。这个插件的真正价值是把对话变成可浏览的思维地图:
- 每次分叉都是在地图上开一条新路
- 最终你得到的不只是一段对话,而是一张完整的思考地形图
- 可以回溯、可以导出、可以嵌入你的笔记体系
核心功能
| 功能 | 说明 | 状态 |
|---|---|---|
| 🔀 从节点分叉 | 右键任意对话节点 → 输入方向 → 创建新的 AI 对话分支 | ✅ |
| 🔀 多方向批量分叉 | 一次输入多个方向,并行生成多条分支 | ✅ |
| 🏷️ 方向标注 | 分叉时输入方向(如"从成本角度分析"),标注在连接线上 | ✅ |
| 🔗 上下文继承 | 沿直系祖先链自动收集对话历史,新分支自带完整上下文 | ✅ |
| 💬 继续追问 | 在当前分支链上追加对话,直线延续 | ✅ |
| 🤖 单次问答 | 不带历史上下文,快速问一句 | ✅ |
| 🎨 多模型配置 | 每个模型独立配置:别名、Provider、Base URL、颜色、图标、系统提示词、Temperature | ✅ |
| 🏷️ 指定模型分叉 | 右键 → 指定模型分叉,不同模型不同视角 | ✅ |
| 🔬 连通性测试 | 配置时一键测试 API 连通性,远端获取模型列表 | ✅ |
| 👁️ 节点视觉区分 | 用户节点灰色、AI 节点用模型配置色,一眼区分谁说的 | ✅ |
| 🌈 分支颜色编码 | 不同分支自动分配不同颜色,一眼看出分叉结构 | ✅ |
| 📤 导出 Markdown | 将整棵对话树导出为带层级缩进、双链引用的 Markdown 文件 | ✅ |
| 📝 节点自动命名 | AI 回答完成后自动写入摘要元数据,Canvas 上不用打开就能看到梗概 | ✅ |
| ⚡ 流式刷新 | token 级流式更新到 Canvas 节点,实时看到 AI 输出 | ✅ |
| 🏷️ 快捷模板 | 分叉弹窗中可点击的模板 chips,一键插入常用方向 | ✅ |
| 🔀 分支合并 | 多分支合并为总结节点 | ✅ |
| ▶️ 回放对话 | 按时间线/广度/深度回放整棵对话树 | ✅ |
| 🌐 多语言 | 简体中文 / English,跟随系统自动切换 | ✅ |
| 🔑 跨平台 API Key | 四层降级策略,支持 .env 文件和直接输入 | ✅ |
| 🌐 BASE_URL 自动匹配 | 读取 API Key 环境变量时自动匹配 BASE_URL | ✅ |
| 🌐 导出交互式 HTML | 单文件 HTML,移动端适配,Markdown 预渲染,离线查看 | ✅ |
| 🎬 对话回放(HTML) | 逐步高亮节点,速度可调,进度条显示 | ✅ |
| 🔍 全文搜索(HTML) | 搜索结果高亮,前后导航 | ✅ |
| 🌓 主题切换(HTML) | 亮色/暗色/跟随系统 | ✅ |
| 📱 移动端适配 | 响应式布局,触摸优化,手势操作 | ✅ |
效果示意
📸 参见上方预览截图
                    ┌──[成本角度]──→ [AI回答: 成本...] ──→ [追问] ──→ ...
[问题: 这个方案如何?] ──┼──[安全角度]──→ [AI回答: 安全...] ──→ [追问] ──→ ...
                    └──[换个思路]──→ [AI回答: 换个...] ──→ [追问] ──→ ...
安装
方式一:手动安装
- 下载 最新 Release
- 解压得到
main.js、manifest.json、styles.css - 放到你的 Obsidian vault 插件目录:
<你的vault>/.obsidian/plugins/canvas-branch-chat/ - Obsidian → 设置 → 第三方插件 → 启用「Canvas Branch Chat」
方式二:从源码构建
git clone https://github.com/p4nt1um/canvas-branch-chat.git
cd canvas-branch-chat
npm install
npm run build
将生成的 main.js、manifest.json、styles.css 复制到插件目录。
配置
API Key 配置(安全方案)
插件支持四种 API Key 配置方式,按优先级从高到低:
1. 设置面板直接输入(最高优先级)
   ↓
2. 插件目录 .env 文件
   ↓
3. Vault 根 .env 文件
   ↓
4. 系统环境变量(最低优先级)
方式一:设置面板直接输入(推荐,最简单)
- 设置页 → 模型配置
- 找到「API Key」输入框
- 直接填入你的密钥(密码框显示,存储在
data.json)
方式二:使用 .env 文件
创建 .env 文件(选择以下任意位置):
- 插件目录:
.obsidian/plugins/canvas-branch-chat/.env - Vault 根:
你的vault/.env
文件内容:
DEEPSEEK_API_KEY=你的密钥
DEEPSEEK_BASE_URL=https://api.deepseek.com/v1  # 可选
方式三:系统环境变量(适合开发者)
- macOS / Linux:编辑
~/.bashrc或~/.zshrc,添加:
保存后执行export DEEPSEEK_API_KEY=你的密钥source ~/.bashrc。 - Windows:搜索「环境变量」→ 系统属性 → 新建用户变量。
设置完成后重启 Obsidian,确保配置被加载。
BASE_URL 自动匹配
如果使用 .env 文件配置 DEEPSEEK_API_KEY,插件会自动读取同文件中的 DEEPSEEK_BASE_URL 并覆盖设置面板的 Base URL 配置。
安全提示:
- ✅ 方式一(直接输入)存储在本地
data.json,仅自己可见 - ✅ 方式二(.env 文件)不会提交到版本控制
- ✅ 方式三(环境变量)最安全,不写入任何文件
- ❌ 不要将密钥提交到 Git 仓库
模型配置
- 设置页 → 添加模型
- 填写配置:
- 别名:显示名(如「分析师」)
- Provider:deepseek / openai / custom
- Base URL:API endpoint
- API Key:选择方式(直接输入 / 环境变量名)
- 点击「测试连接」验证连通性并获取可用模型列表
- 选择模型,配置:
- 颜色:节点边框/背景色
- 图标:节点小标识(🔬🔴🔵)
- 系统提示词:模型人设
- Temperature:创造性 vs 严谨
支持任意 OpenAI 兼容 API(DeepSeek、OpenAI、Ollama 本地模型等)。
使用
- 在 Obsidian 中打开一个 Canvas
- 创建文本节点,输入你的问题
- 右键节点 → 选择操作:
- 🔀 从此处分叉 — 输入方向(支持多个),AI 从该角度回答
- 🏷️ 指定模型分叉 — 选择不同模型/角色进行分叉
- 💬 继续追问 — 在当前分支链上继续对话
- 🤖 提交到 AI — 单次问答,不带历史
- 📥 导出对话树 — 将整棵对话树导出为 Markdown
- 🌐 导出交互式 HTML — 导出为单文件 HTML(移动端友好)
- AI 回答实时流式显示在 Canvas 节点中
导出交互式 HTML
导出的 HTML 文件特点:
- 单文件:CSS/JS 全部内嵌,无需联网
- 移动端适配:响应式布局,触摸友好
- Markdown 渲染:代码块、表格、列表完美显示
- 对话回放:逐步高亮节点,回顾讨论过程
- 全文搜索:快速定位对话内容
- 主题切换:亮色/暗色/跟随系统
文件命名:根节点第一句话_YYYYMMDD_HHMMSS.html
兼容性:Chrome/Safari/Firefox/Edge + iOS Safari/Android Chrome
技术栈
- 平台: Obsidian Plugin API (Canvas)
- 语言: TypeScript
- 构建: esbuild
- API 协议: OpenAI 兼容(支持 DeepSeek、OpenAI 等任意兼容端点)
- 基于: HinxCorporation/obsidian-canvas-ai (MIT)
English
What is this?
This is not "yet another AI chat plugin" — Obsidian already has Text Generator and Copilot. The real value of this plugin is turning conversations into navigable thinking maps:
- Each fork opens a new path on the map
- What you get is not just a conversation, but a complete topography of your thinking
- Traceable, exportable, and embeddable in your note system
Core Features
| Feature | Description | Status |
|---|---|---|
| 🔀 Branch from node | Right-click any node → enter direction → create a new AI branch | ✅ |
| 🔀 Multi-direction batch fork | Enter multiple directions at once, generate branches in parallel | ✅ |
| 🏷️ Direction labels | Label each fork with its exploration direction (e.g., "cost analysis") | ✅ |
| 🔗 Context inheritance | Automatically collect conversation history along the ancestor chain | ✅ |
| 💬 Continue chat | Append dialogue on the current branch chain | ✅ |
| 🤖 Quick ask | Single Q&A without history context | ✅ |
| 🎨 Multi-model config | Per-model config: alias, provider, base URL, color, icon, system prompt, temperature | ✅ |
| 🏷️ Choose model to fork | Right-click → pick a specific model/role to branch with | ✅ |
| 🔬 Connectivity test | One-click API test + fetch remote model list | ✅ |
| 👁️ Visual differentiation | User nodes grey, AI nodes use model's color — instantly distinguishable | ✅ |
| 🌈 Branch color coding | Each branch gets a unique color from the palette | ✅ |
| 📤 Export Markdown | Export the entire conversation tree as hierarchical Markdown with wiki links | ✅ |
| 📝 Auto node naming | AI responses auto-write summary metadata for easy scanning on Canvas | ✅ |
| ⚡ Streaming | Token-level streaming updates to Canvas nodes in real time | ✅ |
| 🏷️ Quick templates | Clickable template chips in the branch dialog for common directions | ✅ |
| 🔀 Branch merging | Combine multiple branches into a summary node | ✅ |
| ▶️ Replay | Step through the conversation tree chronologically | ✅ |
| 🌐 i18n | 简体中文 / English, auto-detect system locale | ✅ |
| 🔑 Cross-platform API Key | Four-tier fallback strategy, supports .env files and direct input | ✅ |
| 🌐 BASE_URL auto-match | Auto-match BASE_URL when reading API Key env variable | ✅ |
| 🌐 Export interactive HTML | Single-file HTML, mobile-friendly, offline viewing | ✅ |
| 🎬 Dialogue replay (HTML) | Step-by-step highlighting, speed control, progress bar | ✅ |
| 🔍 Full-text search (HTML) | Search result highlighting, prev/next navigation | ✅ |
| 🌓 Theme switching (HTML) | Light/Dark/Auto, CSS variables | ✅ |
| 📱 Mobile adaptation | Responsive layout, touch optimization, gestures | ✅ |
Example
📸 See screenshots above
                       ┌──[Cost]──→ [AI: Cost analysis...] ──→ [Follow-up] ──→ ...
[Q: How about this?] ──┼──[Security]──→ [AI: Security...] ──→ [Follow-up] ──→ ...
                       └──[Alt approach]──→ [AI: Alternative...] ──→ [Follow-up] ──→ ...
Installation
Option 1: Manual install
- Download the latest release
- Extract
main.js,manifest.json,styles.css - Place them in your vault's plugin directory:
<your-vault>/.obsidian/plugins/canvas-branch-chat/ - Obsidian → Settings → Community plugins → Enable "Canvas Branch Chat"
Option 2: Build from source
git clone https://github.com/p4nt1um/canvas-branch-chat.git
cd canvas-branch-chat
npm install
npm run build
Copy the generated main.js, manifest.json, styles.css to the plugin directory.
Configuration
API Key Configuration (Secure)
The plugin supports four API Key configuration methods (high to low priority):
1. Direct input in settings (highest priority)
   ↓
2. Plugin directory .env file
   ↓
3. Vault root .env file
   ↓
4. System environment variables (lowest priority)
Method 1: Direct Input in Settings (Recommended, Simplest)
- Settings → Model configuration
- Find "API Key" input field
- Enter your key directly (password field, stored in
data.json)
Method 2: Use .env File
Create .env file (choose any of these locations):
- Plugin directory:
.obsidian/plugins/canvas-branch-chat/.env - Vault root:
your-vault/.env
File content:
DEEPSEEK_API_KEY=your-key-here
DEEPSEEK_BASE_URL=https://api.deepseek.com/v1  # optional
Method 3: System Environment Variables (For developers)
- macOS / Linux: Edit
~/.bashrcor~/.zshrc:
Then runexport DEEPSEEK_API_KEY=your-key-heresource ~/.bashrc. - Windows: Search "Environment Variables" → System Properties → New user variable.
Restart Obsidian after configuration.
BASE_URL Auto-Match
When using .env file with DEEPSEEK_API_KEY, the plugin automatically reads DEEPSEEK_BASE_URL from the same file and overrides the Base URL in settings.
Security Tips:
- ✅ Method 1 (direct input) stores in local
data.json, visible only to you - ✅ Method 2 (.env file) won't be committed to version control
- ✅ Method 3 (env vars) is most secure, not written to any file
- ❌ Never commit keys to Git repository
Model Configuration
- Settings → Add Model
- Fill in:
- Alias: Display name (e.g., "Analyst")
- Provider: deepseek / openai / custom
- Base URL: API endpoint
- API Key: Choose method (direct input / env var name)
- Click "Test Connection" to verify and fetch available models
- Select model, configure:
- Color: Node border/background
- Icon: Small node identifier (🔬🔴🔵)
- System Prompt: Model persona
- Temperature: Creative vs strict
Supports any OpenAI-compatible API (DeepSeek, OpenAI, Ollama local models, etc.).
Usage
- Open a Canvas in Obsidian
- Create a text node and type your question
- Right-click the node → choose an action:
- 🔀 Branch from here — Enter direction(s), AI responds from that angle
- 🏷️ Fork with model — Choose a specific model/role to branch with
- 💬 Continue chat — Continue the conversation on the current chain
- 🤖 Ask AI — Single Q&A, no history
- 📥 Export conversation tree — Export as Markdown
- AI responses stream into Canvas nodes in real time
Tech Stack
- Platform: Obsidian Plugin API (Canvas)
- Language: TypeScript
- Build: esbuild
- API Protocol: OpenAI-compatible (supports DeepSeek, OpenAI, or any compatible endpoint)
- Based on: HinxCorporation/obsidian-canvas-ai (MIT)
License
MIT
Roadmap
See PLAN.md for the full development roadmap.
P2 (Next)
- Context pruning — selectively exclude ancestor nodes when forking
- Smart follow-up — AI suggests follow-up questions
- Skill scanner integration
P3 (Future)
- Industry scenario templates (product review, academic debate, security audit)
- MCP tool calls from branch nodes
- Knowledge base RAG integration
- Export as interactive HTML for sharing
Contributing
Issues and PRs welcome. This is a community project built on top of the MIT-licensed obsidian-canvas-ai.
Built with 🧚♀️ by Zhang Bin