Image Rows and Wraps
 black-manthor123 downloads
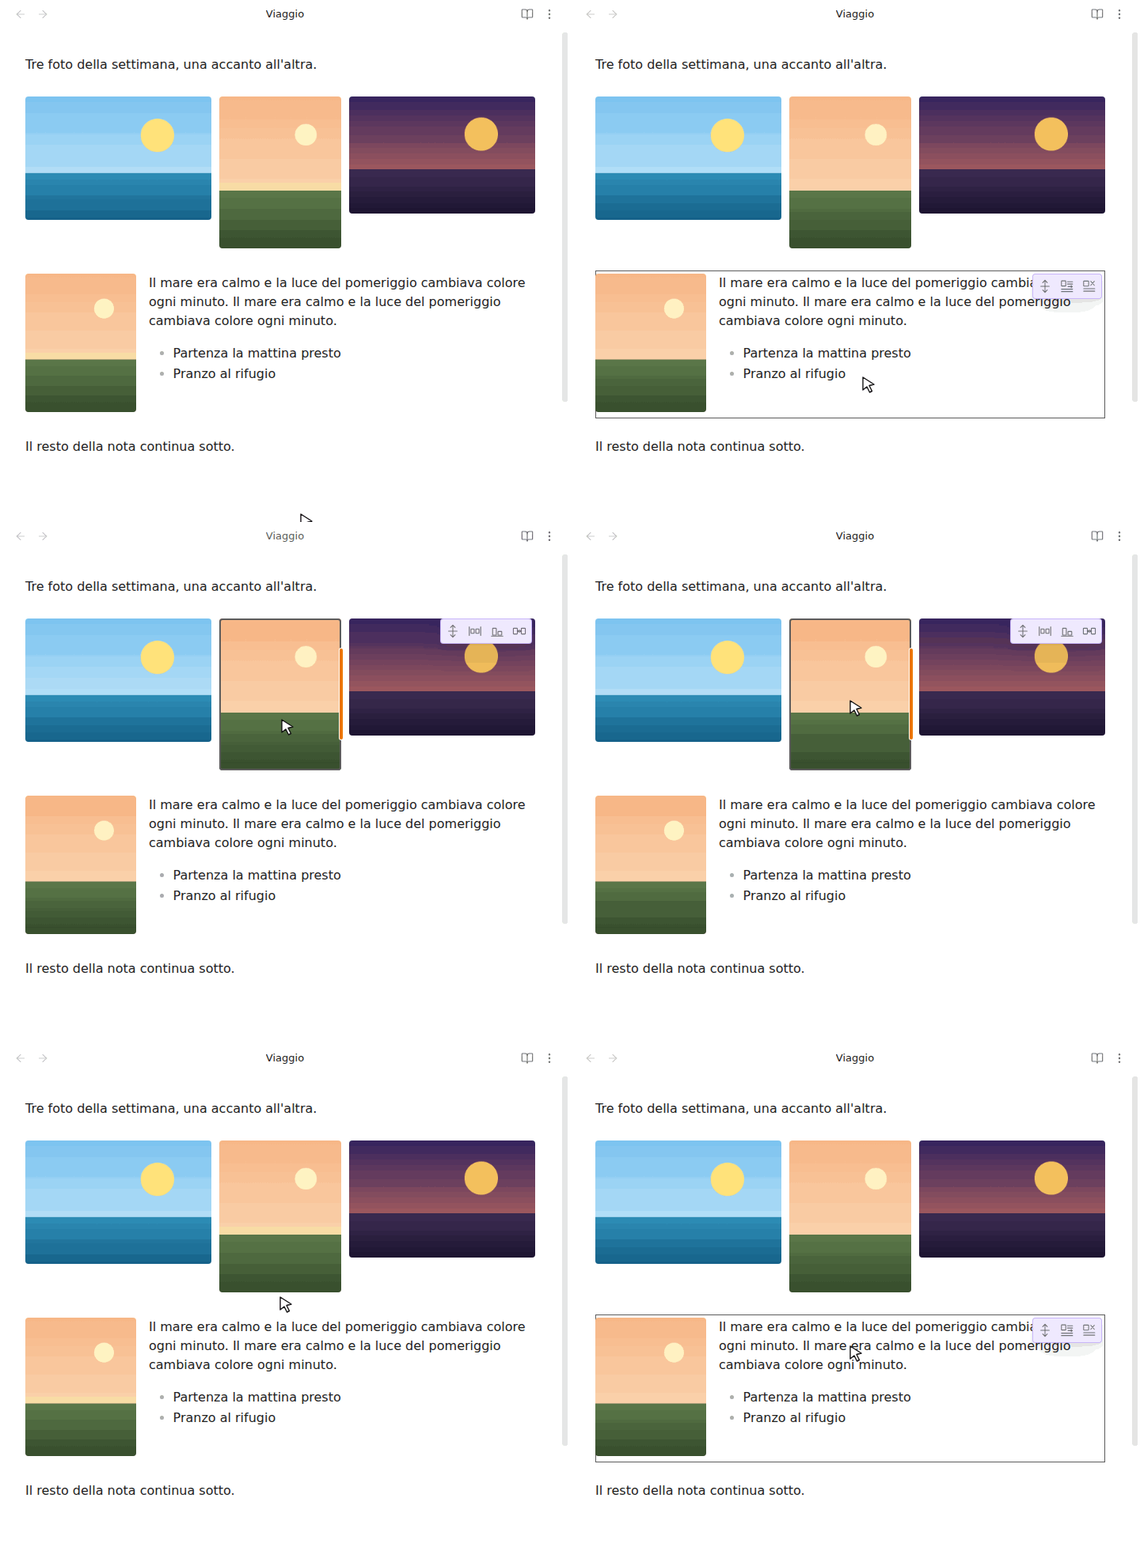
Arrange images side by side in rows or wrap text around them, with the same layout in Live Preview, Reading view and PDF.
- Overview
- Scorecard
- Updates3
English
Arrange images side by side in image rows, or with text flowing beside them (wrap), with the same layout in Live Preview, Reading view and PDF. Notes stay plain Markdown: even without the plugin, the images and the text remain in the note.
[!NOTE] The plugin speaks Obsidian's language: Italian when Obsidian is in Italian, English otherwise.
- Requires Obsidian 1.13.4 or later, desktop only.
- No network connection, no account, no telemetry. The plugin does not read or write files outside the vault.
Installation
From the community directory: Settings → Community plugins → Browse, search for «Image Rows and Wraps», Install, then Enable.
Manual installation
Download main.js, manifest.json and styles.css from the latest release on
GitHub, put them in the folder
<vault>/.obsidian/plugins/image-rows-and-wraps/ and enable the plugin in
Settings → Community plugins.
Upgrading from 0.1.0
Version 0.1.0 had the ID image-flow; from 0.1.1 the ID is
image-rows-and-wraps, because image-flow belongs to another plugin in the
community directory. Obsidian sees the two IDs as two different plugins: move
by hand, so that only one copy is ever enabled.
- In Settings → Community plugins, disable Image Rows and Wraps.
- Install 0.1.1 in
<vault>/.obsidian/plugins/image-rows-and-wraps/, but do not enable it yet. - To keep your settings, copy
data.jsonfrom<vault>/.obsidian/plugins/image-flow/into the new folder. - Delete
<vault>/.obsidian/plugins/image-flow/, after checking that itsmanifest.jsonsays"name": "Image Rows and Wraps": a folder with that name may also hold the other plugin. - Enable Image Rows and Wraps, and assign again any hotkeys you had set: the
commands' IDs now start with
image-rows-and-wraps:.
Your notes need no change.
Image rows
Put image links on the same line, separated by spaces, with a blank line above and below: they become an image row. A single image works too.
Text before.

![[photo-1.png|200]] ![[photo-2.png|300]] ![[photo-3.png|200]]

Text after.
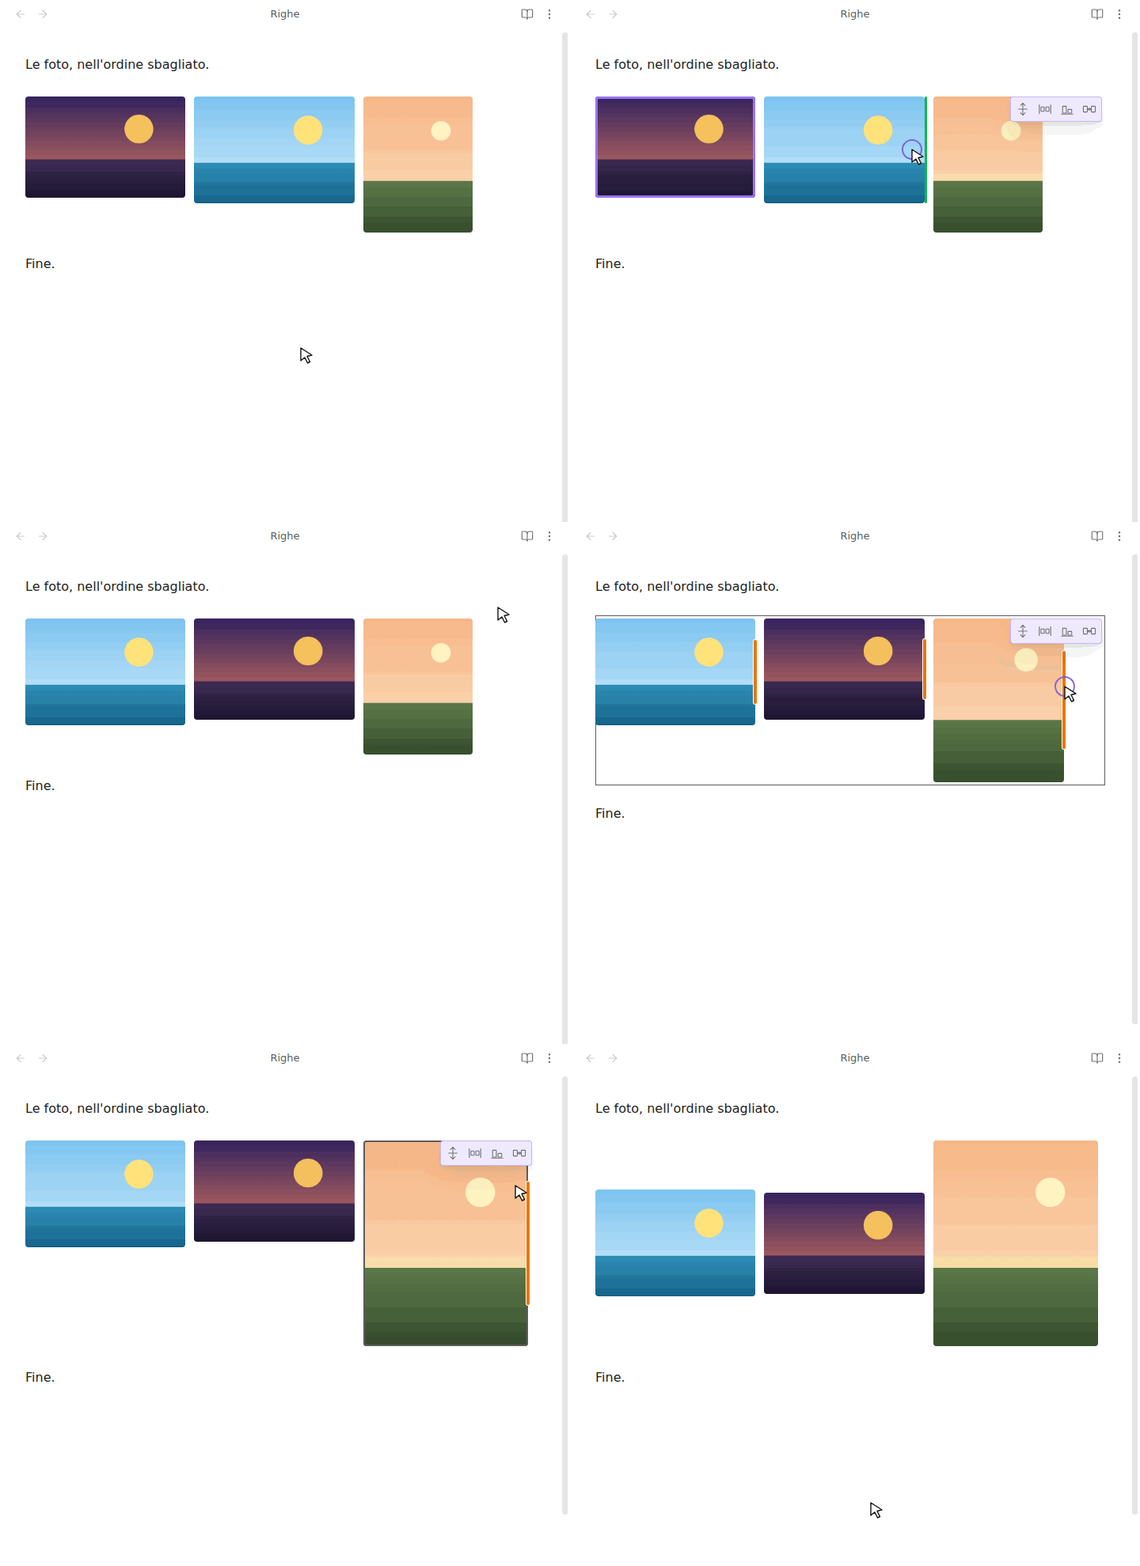
- The number in the link is the desired width, in px. Without a number, the image's original width is used.
- If the images do not fit, they all shrink together, in the same proportion: they never wrap to a new line and are never cropped. With many images, split the row in two.
- In a narrower column the row shrinks; in a wider one it does not grow beyond the chosen widths.
Editing an image row with the mouse, in Live Preview:
- Width: drag the handle on the edge of an image. Only the number in the link changes.
- Order: drag an image before or after another one, also into another row. Dropped between two paragraphs, it becomes a new row.
- Row bar (appears on hover): a handle to move the whole row, the distribution (left, center, right, spread to the edges, spread with margins), the vertical alignment and the gap between the images.
The bar's choices are written in a comment at the end of the row, invisible in
Reading view and in the PDF, for example %%iw-row align=center gap=24%%. You
never need to type it. Without a comment, the defaults from the settings apply.
| Key | Values | Default |
|---|---|---|
align |
left, center, right, between (to the edges), evenly (with margins) |
left |
valign |
top, center, bottom |
top |
gap |
gap in px (on a 700 px wide row) | 12 |
Wrap
A wrap holds an image with text flowing beside it, which continues below once it is taller than the image. Create one with the Add wrap command, with the cursor on an image or a paragraph. In Markdown it looks like this:
[wrap:start] %%iw-wrap side=left%%

![[photo.png|300]]

Text beside the image, which continues below once it is taller than the image.

[wrap:end]
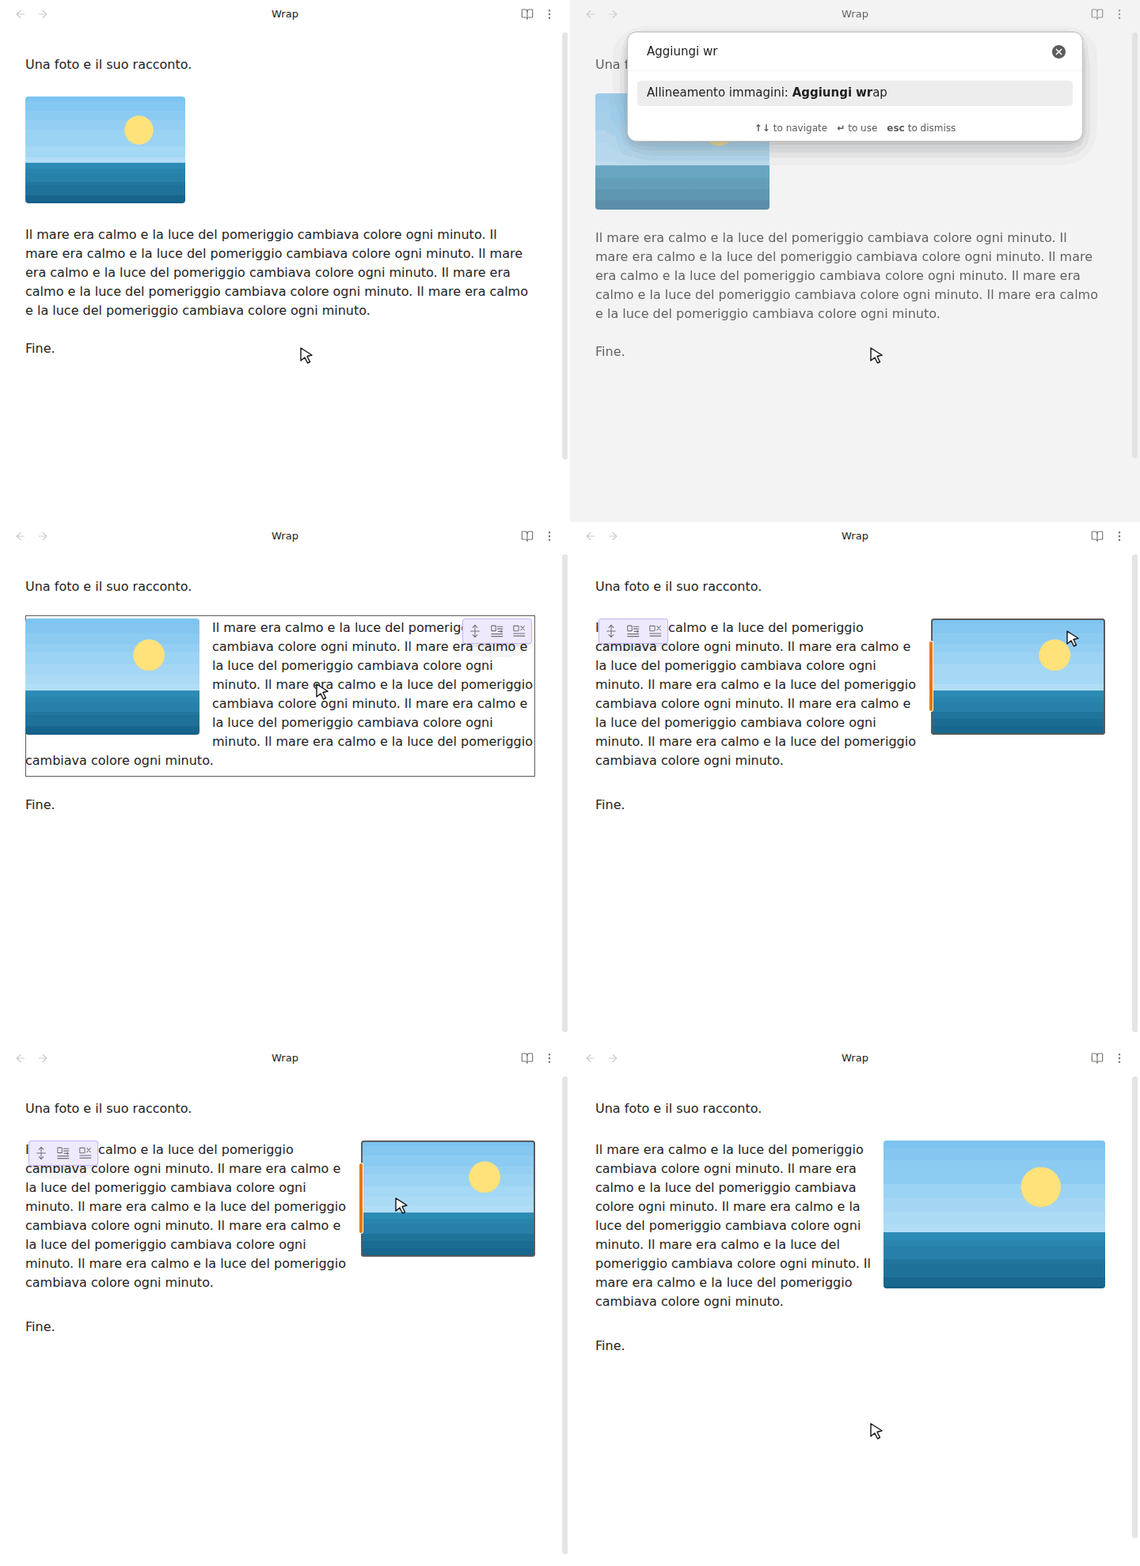
- The image of the wrap goes on the left or on the right (
side=leftorside=right). The text, lists, quotes, tables and code that follow sit beside it. - Width: drag the handle on the image's edge towards the text. The maximum is a percentage of the column, set in the settings.
- Wrap bar (appears on hover): a handle to move the whole wrap, Switch wrap side and Remove wrap, keep content.
Commands
All commands are in the command palette and in the menu of the Image Rows and Wraps button in the ribbon. You can give them a hotkey in Settings → Hotkeys.
| Command | What it does |
|---|---|
| Add wrap | creates a wrap around the image or paragraph under the cursor |
| Switch wrap side | left ↔ right |
| Remove wrap, keep content | removes only the markers |
| Fix the format of the note's wraps | puts the wrap markers on lines of their own, as the commands write them |
| Center images | centers the image row under the cursor. In a wrap, it removes the wrap and turns the image into a centered row |
| Merge with the nearby image row | merges two image rows |
| Put each image in its own row | splits the images into a row each |
| Split the image row before this image | splits the row in two, before the image under the cursor |
| Move image left / right in its row | swaps the image with its neighbour |
| Choose image row distribution / vertical alignment, Choose gap between images | the same choices as the row bar |
Every command, gesture or choice from the bars is a single change, undone with Undo. Only the parts of the Markdown the operation needs are changed. Image files are never modified.
Settings
Settings → Image Rows and Wraps:
- Image dragging: move images with the mouse in Live Preview. When off, Obsidian's own dragging applies.
- Image rows: the default distribution, vertical alignment and gap, for rows without choices of their own.
- Wrap: the gap between image and text, and the image's maximum width.
- Notices: how long the plugin's messages stay on screen.
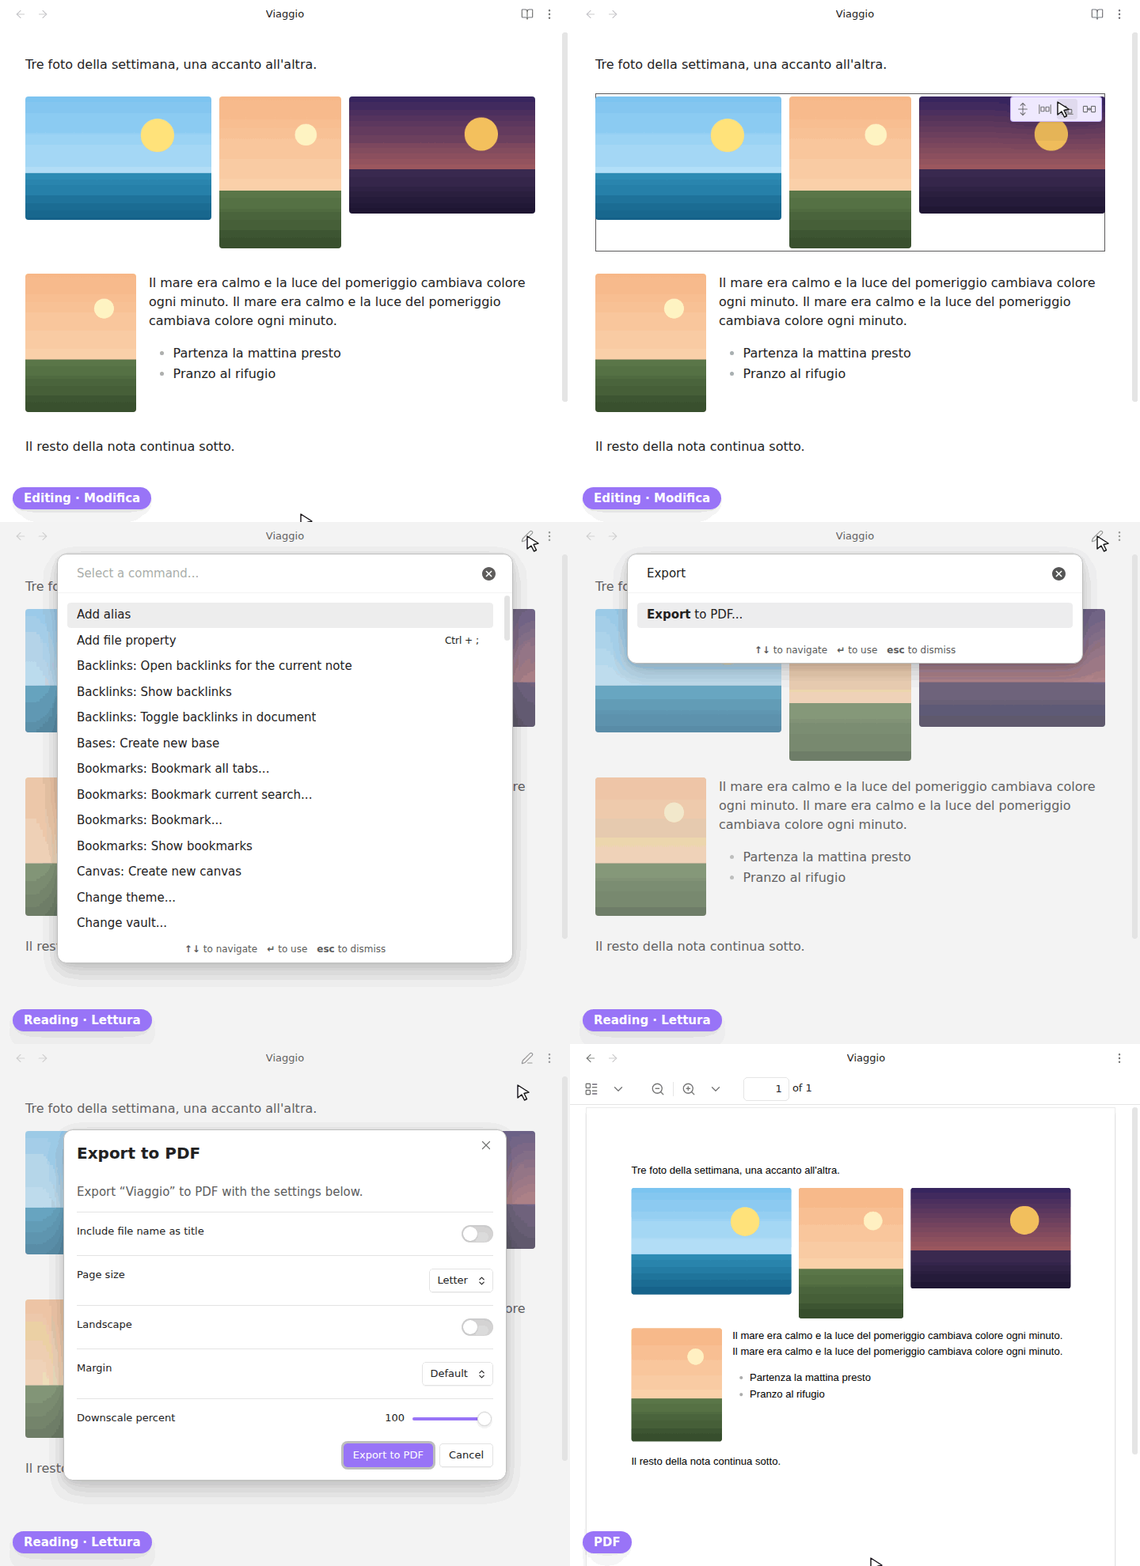
The layout is kept in the PDF exported with Obsidian's Export to PDF and with the Better Export PDF plugin. An image row is not split across two pages, unless it is taller than a page. Tools that convert Markdown without going through Obsidian (for example those based on Pandoc) do not apply the plugin's layout.
Known limits
- Only images written as wikilinks (
![[photo.png]]) are supported for now. Standard Markdown imagesand external images stay as Obsidian shows them. - Image rows inside a wrap, and wraps inside a wrap, are not supported.
- A list, quote, table or code block that starts beside a wrap's image stays in its column until it ends.
- In Reading view, task checkboxes inside a wrap cannot be ticked with a click: use Live Preview.
- A wrap whose markers touch its text (no blank line in between) is in the old format: its bar is orange and has the Fix the wrap's format button.
- Desktop only, for now.
Reporting a problem
Problems and ideas are welcome as issues on GitHub. To contribute code, see CONTRIBUTING.md.
License
MIT © 2026 Black-Manthor.
Italiano
Disponi le immagini in righe di immagini affiancate o con il testo che scorre accanto (wrap), con la stessa impaginazione in Live Preview, in Lettura e nel PDF. Le note restano in Markdown: anche senza il plugin, le immagini e il testo rimangono nella nota.
[!NOTE] Il plugin parla la lingua di Obsidian: italiano quando Obsidian è in italiano, inglese altrimenti.
- Richiede Obsidian 1.13.4 o successivo, solo desktop.
- Nessuna connessione di rete, nessun account, nessuna telemetria. Il plugin non legge né scrive file fuori dal vault.
Installazione
Dal catalogo: Impostazioni → Plugin della comunità → Sfoglia, cerca «Image Rows and Wraps», Installa e poi Attiva.
Installazione a mano
Scarica main.js, manifest.json e styles.css dall'ultima release su
GitHub, mettili nella cartella
<vault>/.obsidian/plugins/image-rows-and-wraps/ e attiva il plugin in
Impostazioni → Plugin della comunità.
Aggiornare dalla 0.1.0
La 0.1.0 aveva l'ID image-flow; dalla 0.1.1 l'ID è image-rows-and-wraps,
perché image-flow appartiene a un altro plugin del catalogo. Per Obsidian i
due ID sono due plugin diversi: il passaggio si fa a mano, in modo che sia
sempre attiva una sola copia.
- In Impostazioni → Plugin della comunità, disattiva Image Rows and Wraps.
- Installa la 0.1.1 in
<vault>/.obsidian/plugins/image-rows-and-wraps/, ma non attivarla ancora. - Per conservare le impostazioni, copia
data.jsonda<vault>/.obsidian/plugins/image-flow/nella nuova cartella. - Cancella
<vault>/.obsidian/plugins/image-flow/, dopo aver controllato che il suomanifest.jsondica"name": "Image Rows and Wraps": una cartella con quel nome può contenere anche l'altro plugin. - Attiva Image Rows and Wraps e riassegna le scorciatoie che avevi impostato:
gli ID dei comandi ora cominciano con
image-rows-and-wraps:.
Le note non vanno cambiate.
Righe di immagini
Inserisci i collegamenti alle immagini sulla stessa riga, separati da spazi, con una riga vuota sopra e sotto: diventano una riga di immagini. Vale anche per una sola immagine.
Testo prima.

![[foto-1.png|200]] ![[foto-2.png|300]] ![[foto-3.png|200]]

Testo dopo.
- Il numero nel collegamento è la larghezza desiderata, in px. Senza numero vale la larghezza originale dell'immagine.
- Se le immagini non ci stanno, si riducono tutte insieme, nella stessa proporzione: non vanno a capo e non vengono tagliate. Con molte immagini, dividi la riga di immagini in due.
- Su una colonna più stretta la riga di immagini si riduce, mentre su una più larga non si ingrandisce oltre le larghezze scelte.
Modificare una riga di immagini con il mouse, in Live Preview:
- Larghezza: trascina la maniglia sul bordo di un'immagine. Cambia solo il numero nel collegamento.
- Ordine: trascina un'immagine prima o dopo un'altra, anche in un'altra riga di immagini. Se la rilasci fra due paragrafi, forma una nuova riga di immagini.
- Barra della riga di immagini (compare al passaggio del mouse): la maniglia per spostare l'intera riga di immagini, la distribuzione (a sinistra, al centro, a destra, sui bordi, con margini), l'allineamento verticale e la distanza fra le immagini.
Le scelte della barra vengono scritte in un commento alla fine della riga,
invisibile in Lettura e nel PDF, per esempio %%iw-row align=center gap=24%%.
Non serve scriverlo a mano. Senza commento valgono i valori predefiniti scelti
nelle impostazioni.
| Voce | Valori | Predefinito |
|---|---|---|
align |
left, center, right, between (sui bordi), evenly (con margini) |
left |
valign |
top, center, bottom |
top |
gap |
distanza in px (su una riga larga 700 px) | 12 |
Wrap
Un wrap contiene un'immagine con il testo che le scorre accanto e continua sotto quando supera la sua altezza. Si crea con il comando Aggiungi wrap, con il cursore su un'immagine o su un paragrafo. Nel Markdown è così:
[wrap:start] %%iw-wrap side=left%%

![[foto.png|300]]

Testo accanto all'immagine, che continua sotto quando supera la sua altezza.

[wrap:end]
- L'immagine del wrap può essere messa a sinistra o a destra (
side=leftoside=right). Il testo, gli elenchi, le citazioni, le tabelle e il codice che seguono le stanno accanto. - Larghezza: trascina la maniglia sul bordo dell'immagine verso il testo. Il massimo è una percentuale della colonna, che si sceglie nelle impostazioni.
- Barra del wrap (compare al passaggio del mouse): la maniglia per spostare il wrap intero, Cambia lato del wrap e Rimuovi wrap mantenendo il contenuto.
Comandi
Tutti i comandi sono disponibili nella palette dei comandi e nel menu del pulsante Image Rows and Wraps nella barra laterale. Puoi assegnare loro una scorciatoia da Impostazioni → Tasti di scelta rapida.
| Comando | Cosa fa |
|---|---|
| Aggiungi wrap | crea un wrap attorno all'immagine o al paragrafo sotto il cursore |
| Cambia lato del wrap | sinistra ↔ destra |
| Rimuovi wrap mantenendo il contenuto | toglie solo i marcatori |
| Correggi il formato dei wrap della nota | mette i marcatori dei wrap su righe proprie, come i comandi li scrivono |
| Centra immagini | centra la riga di immagini sotto il cursore. In un wrap, rimuove il wrap e dispone l'immagine in una riga di immagini centrata |
| Unisci con la riga di immagini vicina | unisce due righe di immagini |
| Metti ogni immagine su una riga propria | separa le immagini, creando una riga di immagini per ciascuna |
| Dividi la riga di immagini prima di questa | divide la riga di immagini in due, prima dell'immagine sotto il cursore |
| Sposta l'immagine a sinistra / a destra nella riga | scambia l'immagine con la vicina |
| Scegli la distribuzione / l'allineamento verticale della riga di immagini, Scegli la distanza tra le immagini | offre le stesse scelte della barra della riga di immagini |
Ogni comando, gesto o scelta dalle barre è una sola modifica, annullabile con Annulla. Cambiano solo le parti del Markdown necessarie all'operazione. I file delle immagini non vengono mai modificati.
Impostazioni
Impostazioni → Image Rows and Wraps:
- Trascinamento immagini: permette di spostare le immagini con il mouse in Live Preview. Se disattivato, il trascinamento resta quello di Obsidian.
- Righe di immagini: permette di cambiare i valori predefiniti di distribuzione, allineamento verticale e distanza, per le righe di immagini che non hanno valori propri.
- Wrap: permette di definire la distanza fra immagine e testo e la larghezza massima dell'immagine.
- Avvisi: permette di definire la durata dei messaggi del plugin.
L'impaginazione viene mantenuta nel PDF esportato con Esporta in PDF di Obsidian e con il plugin Better Export PDF. Una riga di immagini non viene spezzata fra due pagine, salvo che sia più alta della pagina. Gli strumenti che convertono il Markdown senza passare da Obsidian (per esempio quelli basati su Pandoc) non applicano l'impaginazione definita dal plugin.
Limiti noti
- Al momento sono supportate solo le immagini scritte come wikilink
(
![[foto.png]]). Le immagini Markdown standarde quelle esterne restano come Obsidian le mostra. - Non sono supportate righe di immagini dentro un wrap né wrap annidati.
- Un elenco, una citazione, una tabella o del codice che iniziano accanto all'immagine di un wrap restano nella loro colonna fino alla fine.
- In modalità Lettura le caselle delle attività dentro un wrap non si spuntano con un clic: usa Live Preview.
- Un wrap scritto con i marcatori attaccati al testo (senza una riga vuota in mezzo) è nel formato vecchio: la sua barra è arancione e ha il pulsante Correggi il formato del wrap.
- Solo desktop, per ora.
Segnalare un problema
Problemi e idee sono benvenuti come issue su GitHub. Per contribuire al codice, vedi CONTRIBUTING.md (in inglese).
Licenza
MIT © 2026 Black-Manthor.