Discussions
 Deepal Jayasekara19 downloads
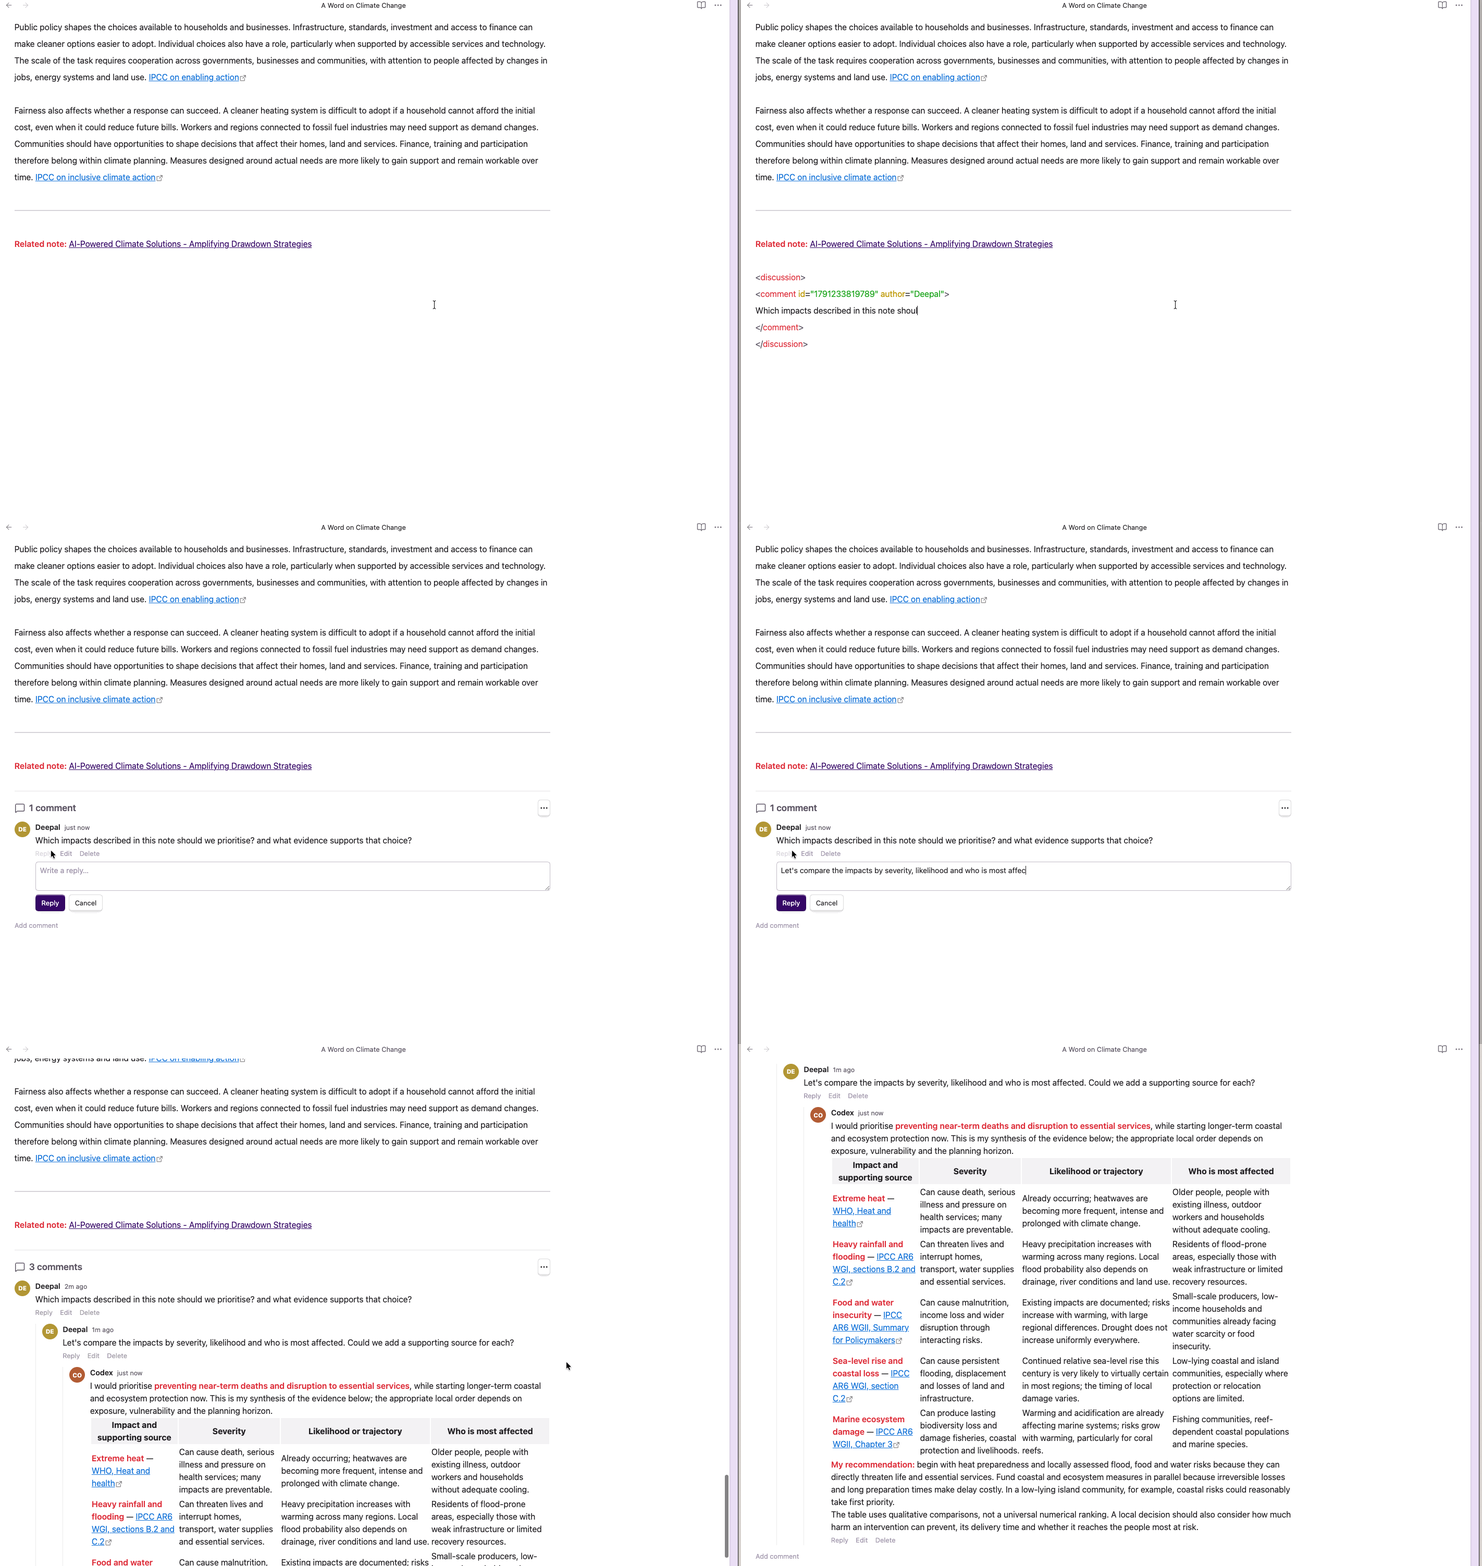
Jira-style threaded discussions in a note — nested replies rendered from <comment> blocks, in reading and live preview modes.
- Overview
- Scorecard
- Updates3
A plugin for Obsidian that lets you collaborate with AI agents through threaded discussions in your notes. Leave instructions, ask questions, review an agent's changes, and reply to its suggestions alongside the content you're working on.
Comments appear in a panel with author names, timestamps, and nested replies. They are saved directly in your Markdown files, so an agent with access to your notes can read the conversation and write replies in the same format. You use the discussion panel in Obsidian; the agent works with the note's text. The conversation stays with the note, ready for the next round of feedback.
You can also use Discussions for conversations with other people or your own review notes. No account or external discussion service is needed to store comments.
Features
- Communicate with agents through comments stored in the note they are working on.
- View discussions in Reading view and Live Preview.
- Add comments, reply, and edit directly in the discussion panel.
- Delete a comment and its replies, or delete an entire discussion, with confirmation.
- Write Markdown in comments, including lists and internal or external links.
- See author initials, consistent avatar colours, and timestamps.
- Add empty discussions to note templates.
Installation
Requires Obsidian 1.13.0 or newer, as specified in the plugin manifest.
Community plugins
Once Discussions is listed in the community directory:
- Open Settings → Community plugins and turn on community plugins if needed.
- Select Browse and search for Discussions.
- Select Install, then Enable.
See Obsidian's community plugin guide for more about installing and enabling plugins.
Manual installation
To install before a community listing is available, or to try a specific release:
- Download
main.js,manifest.json, andstyles.cssfrom a GitHub release. Use the individual release files; the source archives do not contain the built plugin. - Create a
comment-blockfolder inside your vault's.obsidian/plugins/folder. - Copy all three files into that folder.
- Reload Obsidian, open Settings → Community plugins, and turn on community plugins if needed. Enable Discussions in the installed plugins list.
If your vault uses a custom configuration folder, replace .obsidian with its name.
If no release files are available yet, follow the development instructions
to build the plugin from source.
Getting started
- Open Settings → Discussions and set Your name. If you leave it blank,
new comments use
anonymousas the author. - Open a note in editing mode and place the cursor on a blank line where you want the discussion to appear.
- Open the command palette and run Discussions: Start discussion.
- Type your first comment in the empty comment body, where the command places your cursor. Move the cursor outside the discussion, or switch to Reading view, to see the panel.
- Use Reply to respond to a comment, or Add comment to start another top-level conversation in the same panel.
In the panel's comment and reply forms, use Ctrl+Enter (Windows/Linux) or Cmd+Enter (macOS) to submit, and Escape to cancel. The buttons work too.
Use Edit to change a comment's text. Delete removes that comment and all its nested replies after confirmation. To remove the whole panel, open the … menu and select Delete discussion. Deleting the last comment leaves an empty panel ready for a new conversation.
The editor shows raw tags while your cursor or selection is inside a discussion and renders the panel when you move outside it. This also applies in Source mode. To keep the tags visible throughout the editor, turn off Enable comment threads.
Try the sample note by copying it into your vault.
Working with agents
Use an agent that can read and edit your vault's Markdown files through your existing agent setup. Discussions provides the conversation interface in Obsidian; you configure and run the agent separately.
For example, when drafting or reviewing a note:
- Add a comment with your request, such as “Review this draft and suggest a clearer opening. Explain your changes in a reply.”
- Run your agent and ask it to read the note and its discussion, make the requested changes, and reply in the same discussion.
- Read its response in Obsidian and use Reply to give feedback or ask a follow-up question.
- Run the agent again when you're ready for another pass. Your instructions, its replies, and the note remain together.
Give the agent the storage format below, or use this instruction with your request:
Read the note and its discussion before making changes. Write your response as a new
<comment>block inside the existing<discussion>, using your agent name asauthorand a unique Unix timestamp in milliseconds asid. To reply, setparent_idto the ID of the comment you're answering. Append your block after the existing comments, before</discussion>, and preserve the existing conversation.
Settings
| Setting | Default | What it does |
|---|---|---|
| Enable comment threads | On | Displays discussion panels. Turn off to stop rendering them. |
| Your name | Blank | Sets the author name for new comments and replies; falls back to anonymous. |
| Render Markdown in comments | On | Formats comment bodies as Markdown. Turn off to display plain text. |
Changing Your name does not rename existing comments. Author names are labels stored in the note; they are not verified accounts, and any comment can be edited through the panel.
Storage and templates
You can use the plugin without writing tags yourself. The command and panel controls create and update them for you.
For a note template, put this empty discussion on its own line, with blank lines around it. It renders a panel with Add comment ready for the first message:
<discussion></discussion>
A discussion with a comment and a reply looks like this in the note's source:
<discussion>
<comment id="1784117344071" author="You">
Could you review this draft and suggest a clearer opening?
</comment>

<comment id="1784117382527" parent_id="1784117344071" author="Agent">
I've revised the opening to state the main idea first. What do you think?
</comment>
</discussion>
If you edit the source by hand:
- Keep each comment's
idunique within the note. Generated IDs are timestamps in milliseconds, used for creation times and chronological ordering. - Set
parent_idto the ID of the comment being answered, and keep the parent before its replies in the source. Keep all comments in the same discussion. - Use double quotes around attribute values. Keep comment blocks flat;
replies are linked by
parent_id, rather than by nesting tags. - Put only comment blocks and whitespace inside
<discussion>. Put regular note content outside the wrapper, separated from it by blank lines.
Older notes with consecutive <comment> blocks and no wrapper are also
supported. Whitespace-separated comments form one panel; other text starts a
separate panel. Tags inside fenced code blocks or inline code are ignored.
Discussions can appear anywhere in a note; the bottom is often a convenient place. Disabling or uninstalling the plugin leaves the stored comments in the file, but the discussion panels require the plugin to render.
The plugin does not provide its own sharing or synchronization service. To exchange comments with someone else, share or synchronize the note using your existing workflow.
Feedback
Report bugs or suggest improvements through GitHub issues. For rendering problems, include your Obsidian version, view mode, and a small example note that reproduces the issue.
Development
From a local checkout, use Node.js 24 (see .nvmrc) and install dependencies
with npm.
npm ci
npm run build   # Type-check and create a production main.js
npm test        # Run parser and comment-editing unit tests
npm run dev     # Watch source, manifest.json, and styles.css for changes
Builds stay in the repository unless you set a deployment target. Copy
main.js, manifest.json, and styles.css into your test vault's plugin folder,
or set OBSIDIAN_VAULT_DIR to deploy automatically:
OBSIDIAN_VAULT_DIR="/path/to/test-vault" npm run dev
The build copies the files into .obsidian/plugins/comment-block/, or updates
all existing plugin folders in that vault whose manifest ID is comment-block.
Alternatively, set OBSIDIAN_PLUGIN_DIR to target one plugin folder explicitly.
Both development and production builds deploy when either variable is set.
Reload the plugin in Obsidian after a rebuild to load the updated code.
Versioning and releases
Releases use Semantic Versioning and are published by semantic-release through the CI and release workflow. Use Conventional Commits for commit messages. If you squash a pull request, its title becomes the commit message and must follow the same format.
| Commit message | Release |
|---|---|
fix: correct discussion rendering |
Patch, for example 1.0.0 → 1.0.1 |
feat: add a discussion setting |
Minor, for example 1.0.0 → 1.1.0 |
feat!: change the comment storage format |
Major, for example 1.0.0 → 2.0.0 |
Any commit with a BREAKING CHANGE: footer |
Major |
docs:, test:, ci:, chore:, or refactor: without a breaking change |
No release |
The workflow tests and builds pull requests and pushes to main. After those
checks pass on main, it determines the next version from commits since the
last release, then:
- Generates release notes and updates CHANGELOG.md.
- Synchronizes
package.json,package-lock.json, andmanifest.json, and adds the new version's minimum Obsidian version toversions.json. - Builds the plugin and commits the updated version files and changelog to
mainwithchore(release): <version> [skip ci]. - Creates a tag such as
1.0.0, without avprefix, and publishes a GitHub release withmain.js,manifest.json, andstyles.cssattached. - Generates GitHub build provenance attestations for those release files.
Obsidian requires the release tag to exactly match the version in the manifest
on the repository's default branch. It installs the attached files from that
release. Do not bump versions or create release tags manually; the workflow
keeps them in sync. To raise the minimum Obsidian version, edit minAppVersion
in manifest.json as part of the relevant feature or fix.
First release and GitHub setup
There are no existing release tags when this automation is introduced, so
semantic-release starts at 1.0.0, even though the unreleased development
manifest currently says 0.1.0. The existing feat: commit triggers that
initial release. Once these changes are pushed to main, wait for the
CI and release workflow to finish, then retry the Obsidian submission.
The workflow uses GitHub's built-in GITHUB_TOKEN with contents: write,
id-token: write, and attestations: write for the release job; no npm token
or additional repository secret is needed.
The package is private and is distributed through GitHub releases only.
Repository or organization policies must allow this permission. If main
is protected, allow the release bot to push the version/changelog commit
using your repository's branch rules and, if required, a GitHub App token
with the appropriate access.
You can rerun the release check through Actions → CI and release → Run
workflow on main. This does not force a new release when no qualifying
commits exist. To preview version analysis and release notes locally, run
npm run release:dry-run in a checkout with full Git history and tags and
an authorized GITHUB_TOKEN. The dry run checks repository access but does
not update version files, create a tag, or publish a release.
Searchable settings and linting
Settings are searchable from Obsidian's global settings search. Development uses the official Obsidian lint rules; the lint package's Obsidian dependency is overridden to match the API version used by this plugin.
License
MIT, copyright 2026 Deepal Jayasekara.