aDHL
 tine-schreibt8k downloads
Create pretty static highlighters from search or regEx. Group by tag and set commands for toggling. Based on Dynamic Highlights. Works well with Highlightr.
- Overview
- Scorecard
- Updates13
This plugin is based on 'Dynamic Highlights' by @nothingislost. I fixed a bug in the regEx, but otherwise I left the basic mechanics untouched. I just added a lot more customisability and some usability features, which I hope you find worthwhile.
/// UPDATES -------------------
2026-04-25: @Moyf added a bunch of stuff:
- Some UI fixes (responsiveness, improved dark mode)
- Option to duplicate queries
- A debug mode
2026-03-26: You can now choose the min length of selection highlights. Set it to 1 to work for Chinese characters.
2025-08-16: @leonrjg added capture group functionality. Thank you!
/// ----------------------------
Some of the highlight styles were inspired by those available in 'Highlightr' by @chetachiezikeuzor, so if you're using that, aDHL should fit right in, style wise.
Here's a picture of the settings panel as it looks on desktop, including some use cases and highlighter examples. Scroll down to find all elements explained, left to right, top to bottom. The example queries can be found all the way down.
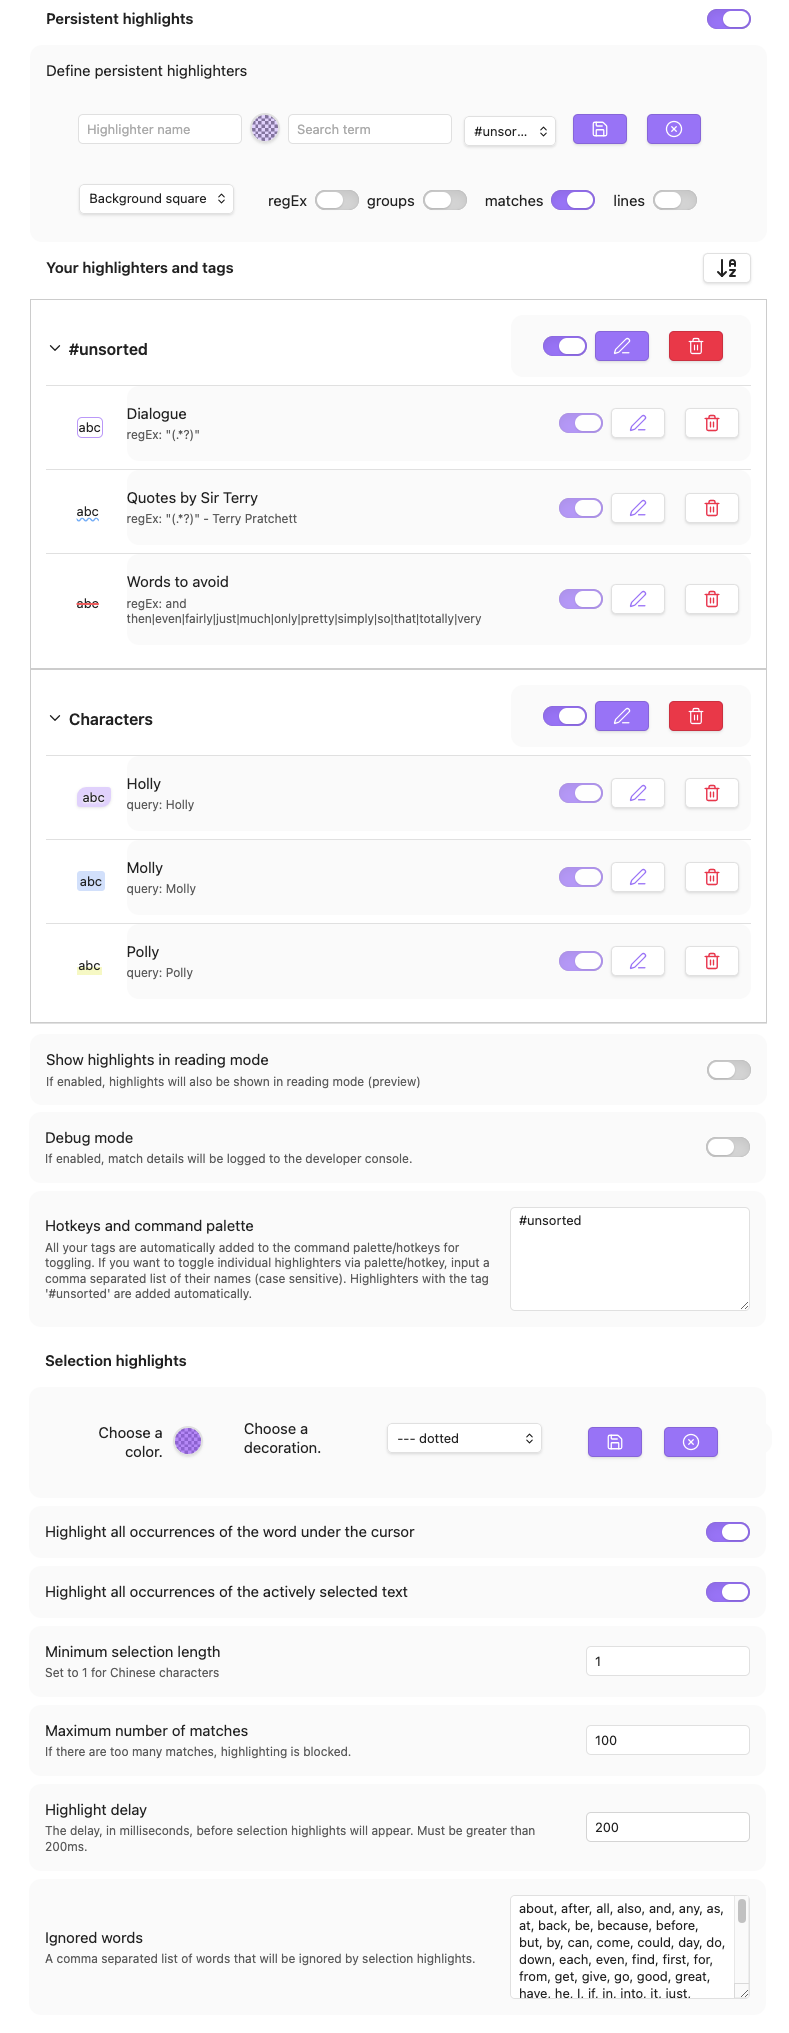
Persistent highlights
- Import: Imports settings. Importing highlighters from the original plugin won't work, sorry. But in order to get the benefits of the new plugin, you'll have to touch the settings of each highlighter anyway, so...
- Export: Exports settings.
- Toggle: This is The Switch that starts/stops all persistent highlights being rendered; find it in the Command Palette/Hotkey panel.
Define persistent highlighters
- First Row:
- First input field: Here you input your highlighter's name.
- Checkerboard circle: This is the color picker. Click on it to get a... well, picker, and the option to input a hexa or hsla. By default it's set to your chosen accent color with an opacity of 0.25.
- Second input field: Here you input your search query. It also shows what the highlight will look like. If a highlight seems to not be rendered, try upping the opacity of your color or (mostly if you're using a Dark Theme) changing it altogether.
- Dropdown: All your tags. Choose one or make a new one. Intended to group your highlighters together and make them easier to manage. Find all your tags in the Command Palette/Hotkey panel.
- Save button: Save your highlighters.
- Discard button: Discard changes; useful when you start to edit a highlighter and then think better of it.
- Second row
- Dropdown: So many decoration styles! Choose one that fits your vibe and/or purpose.
- RegEx toggle: Turn regEx on/off. This obviously uses JavaScript flavoured regEx. Find info here: https://www.regular-expressions.info. As I said, I fixed one bug, but there might be some left.
- Groups toggle: Toggle capture groups on/off.
- Matches toggle: Toggle on/off if matches will be highlighted.
- Parent line toggle: Toggle on/off if the parent line of a match will be highlighted.
Your highlighters and tags
- Sort button: By default newly created tags appear at the top of the list, and newly created highlighters appear at the top inside their tag, its tag also being moved to the top. Once you're done creating, sort it all alphabetically (or don't, I'm not your boss).
- Caret: UI iconography thingy that tells you that this element can be expanded/collapsed.
- Tag name: The name of your tag(s). #unsorted is the default tag. Your tags don't need a #, though.
- Toggle: Starts/stops rendering of all highlighters associated with this tag. Individual highlight settings remain intact.
- Edit button: Edit the tag name. If you choose a name that already exists, both tags will be merged.
- Delete button: Delete the tag. This will also delete all highlighters associated with it, but there's a modal and a hurdle before anything is actually deleted, so you should be safe.
- abc icon: This is a little preview of what your highlighter will look like. I think it's cute.
- Highlighter name and query/regEx: The name of your highlighter and the stuff that it will highlight. Be sure to check if you have regEx enabled, if your regEx highlight doesn't seem to work.
- Toggle: Toggle this highlighter on/off.
- Edit button: Edit your highlighter.
- Delete button: Delete your highlighter.
Show highlights in reading mode
- Toggle on or off if you want your highlights to be rendered in reading mode, too.
Enable debug mode
- If enabled, match details will be logged to the console - provided you have highlighting for reading mode enabled, and you editor is in reading mode.
Hotkeys and command palette
- All your tags are automatically added to the command palette/hotkeys for toggling. If you want to toggle individual highlighters via palette/hotkey, you can input a comma separated list of their names (case sensitive). Highlighters with the tag '#unsorted' are added automatically.
- Input field: For the names of the tags whose highlighters you want to toggle individually. Be aware of your spelling, there's no check. Just type or delete away; saving happens automatically, deletions take effect when you reload Obsidian.
Selection highlights
- Choose a color: Self explanatory, really.
- Choose a decoration: All the deco available for static highlighters you also can choose for your dynamic highlights.
- Save button: Save the style you made. I would give you a preview but couldn't figure out how.
- Cancel button: For when you regret your choices.
- Highlight all occurrences of the word under the cursor: Is very useful to avoid repetition on the fly. Find a toggle for this in the Control Palette/Hotkey panel. You can also set a delay.
- Highlight all occurrences of the actively selected text: As the description says. Find a toggle for this also in the Control Palette/Hotkey panel.
- Mininum selection length: You can set this to 1 so Chinese characters can be highlighted.
- Maximum number of matches: If the plugin finds more matches than this, highlighting will be blocked.
- Highlight delay: For when you want the word around your cursor to be highlighted, but only when you stop typing for a moment.
- Ignored words: A list of words you don't want to be highlighted, even when they are under the cursor. By default this field contains the 100 most commonly used words of the English language. Empty it if you like; saving happens automatically.
Example queries that use regEx
- Highlight all dialogue:
- make sure to NOT copy the two backticks ``.
"(.*?)"<- Highlights all between two ""'(.*?)'<- Highlights all between two ''
- Highlight several words:
- same here; don't copy the two backticks ``.
untoward |henceforth |betwixt<- the pipe - | - means 'or', so this highlights all these words; spaces are there to make it more readable, they are also part of the search term, though, so instances where the word is followed by a,won't be highlighted. Keep that in mind when phrasing your search./untoward |henceforth |betwixt/i<- This highlights all these words, case INsensitive; due to the way regEx is implemented in this plugin, mixing case sensitive and insensitive in a single regEx doesn't work.
And that's it. Let me know if I forgot anything. I might add a modal for on/off toggling, but only if many people would find that useful.
If you want to express your joy at finding this neat little piece of code, you can throw me some coin: https://ko-fi.com/tine_schreibt