Search...Search plugins and themes...
⌘K
Sign in
  • Get started
  • Download
  • Pricing
  • Enterprise
  • Account
  • Obsidian
  • Overview
  • Sync
  • Publish
  • Canvas
  • Mobile
  • Web Clipper
  • CLI
  • Learn
  • Help
  • Developers
  • Changelog
  • About
  • Roadmap
  • Blog
  • Resources
  • System status
  • License overview
  • Terms of service
  • Privacy policy
  • Security
  • Community
  • Plugins
  • Themes
  • Discord
  • Forum / 中文论坛
  • Merch store
  • Brand guidelines
Follow us
DiscordTwitterBlueskyThreadsMastodonYouTubeGitHub
© 2026 Obsidian

Power Editor

Power PluginsPower Plugins67 downloads

Format any note from a toolbar, selection bubble, or slash menu: WYSIWYG editing, block drag handles, image resizing, dictation, and AI edits, all staying plain Markdown.

Add to Obsidian
  • Overview
  • Scorecard
  • Updates19

A rich formatting toolbar, a TipTap-style selection bubble, block drag handles, a true WYSIWYG mode, dictation, and image resize handles on every note, built on Obsidian's own editor, so notes stay plain Markdown and every other plugin (including Power Tables) keeps working.

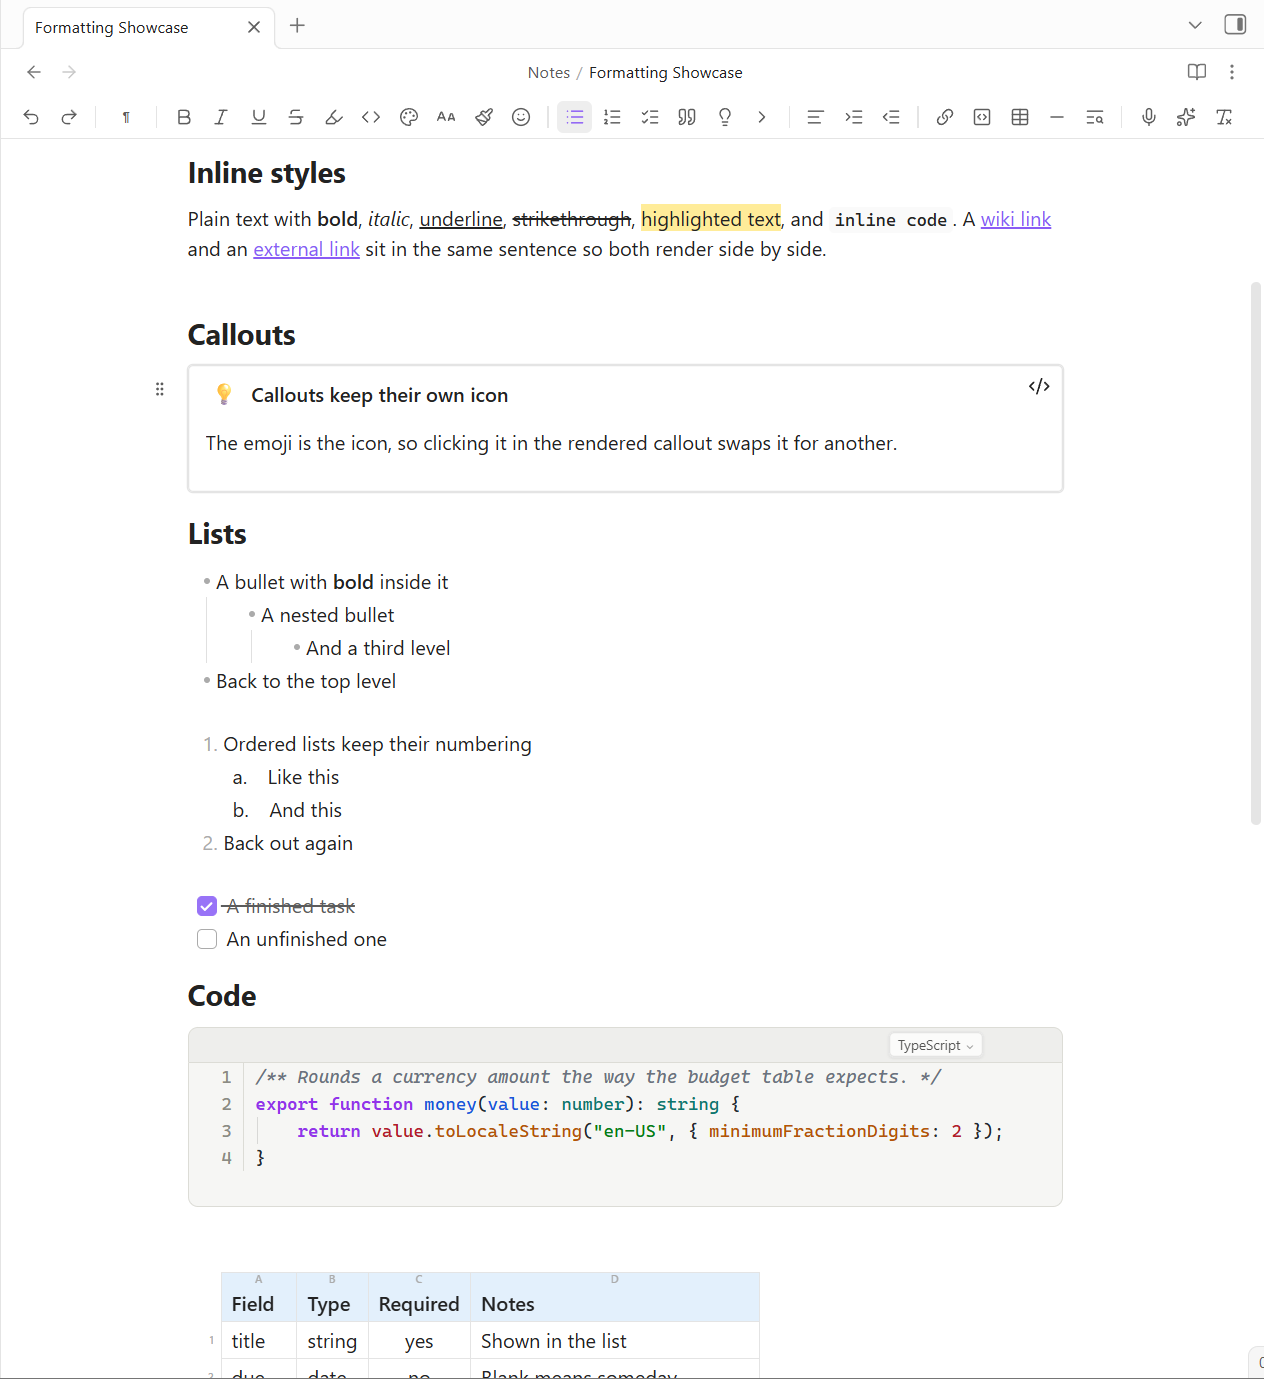
A note in editing view with the formatting toolbar across the top, a rendered callout with a drag handle beside it, nested and numbered lists, checkboxes, and a syntax-highlighted TypeScript block with line numbers

The toolbar sits above the note and its buttons track the cursor, so the list button is lit while the cursor is in a list. Markers stay hidden while the text stays styled: bold reads as bold and the highlight is painted, with no ** or == on screen. The drag handle to the left of the callout moves the whole block. The file underneath is still ordinary Markdown.

Three ways to format

  • The toolbar at the top of each note in editing view: undo/redo, a paragraph-style dropdown (Normal, H1-H6, showing the current style), bold, italic, underline, strikethrough, highlight color, inline code, text color, font size & sub/superscript, format painter, the three list types, quote, callout, alignment, indent/outdent, link, code block, insert table, horizontal rule, dictate, AI edits, and clear formatting. Every button reflects the cursor's formatting. Detection reads CodeMirror's real syntax tree, so states are exact. Pick which buttons you want in settings.
  • The selection bubble: select text and a compact bubble appears right there, bold/italic/underline/strike/highlight/code, color, link, format painter, AI edits, clear. Your hand never travels to the top of the pane.
  • Slash commands: type / for the insert menu, headings, lists, checklist, quote, callout (with a type picker, or straight to one: /tip, /warning, /note…), toggle block, code block, table, rule, today's date, dictate, plus the rest of the Power family when installed: record a meeting, capture a YouTube video, ask your vault, insert a totals row, embed a new base, open Recent Pages.

Every toolbar action is also a command, so anything can have a hotkey: underline, alignment, indent, format painter, clear formatting, insert link, dictate, block moves.

WYSIWYG mode

Live Preview normally reveals **, ==, <u>, and link brackets while the cursor is inside them. Power Editor keeps them hidden and styles the text live. Bold looks bold, colors stay colored, links show only their text, headings never show their #. The markers still exist in the file; you just never see them. Toggle in settings.

Blocks: drag, click, transform

Hover any block for a grip in the margin:

  • Drag it to move the whole block (a paragraph, a list item with all its children, a table, quote, or code block) with a drop line showing the landing spot. Headings carry their whole section (everything until the next same-level heading); toggle that off to move heading lines alone. Select across several blocks first and the grip moves them together.
  • Click it for the block menu: Turn into (paragraph, headings, lists, checklist, quote, callout. Callouts open a type picker: tip, note, info, success, question, warning, danger, example, quote, or a collapsible toggle block), Duplicate, Copy link to block (creates the ^id and copies [[note#^id]]), Move to top/bottom, Delete.
  • Spacing is automatic (blank lines between prose, gluing inside lists), Escape cancels, the pane auto-scrolls at its edges, and every operation is one undo step. Move block up / Move block down commands use the same engine. Bind them to Alt+Shift+↑/↓.

Callouts that actually stand out

The callout button (lightbulb, next to Quote) turns the block under the cursor into a tinted, accented box with a big icon: Tip 💡, Note 📝, Info ℹ️, Success ✅, Question ❓, Warning ⚠️, Danger 🚨, Example 🧪, Quote 💬. Each one is also a slash item and a bindable command, so /tip (or a hotkey) goes straight there without a second menu.

  • The emoji is the icon, Notion-style. Click it in the rendered callout to swap it for any other. A callout you typed by hand keeps the type's own icon instead, so > [!tip] still shows a lightbulb (Obsidian's flame is retired here).
  • The label goes. Turn **Tip:** Download from the App Store into a Tip callout and you get > [!tip] 💡 Download from the App Store. The box already says "tip", so it doesn't say it twice. Works for the aliases too: "Caution:" becomes a warning, "Hint:" a tip.
  • Still plain Markdown: > [!tip], which every other plugin, Reading view, mobile, and publish already understand.

Converting notes you already have

Notes written before callouts existed carry the type as a lead-in label instead, > **Tip:** …, **Note:** …. Three commands upgrade them:

  • Callouts: convert Tip/Note/Warning lead-ins in this note, one note, one undo step.
  • Callouts: convert lead-ins across the vault…, opens a preview: how many lines, in which notes, becoming which flavor. Nothing is written until you press Convert. Right-click any folder in the file explorer for the same thing scoped to that folder.
  • Bold labels (**Note:**, **Note**:) convert by default. Plain ones (Note: …) are opt-in behind a toggle, because ordinary prose opens with a word and a colon too.

A quoted lead-in keeps its blockquote and just gains the header; a plain paragraph is pulled into the callout, body lines and all. Code fences, frontmatter, list items, and callouts you already have are never touched.

Last edited, on the page

A quiet "Edited 3 minutes ago" line, the way 1Password stamps an item. Obsidian already tracks every file's modified time; this is the part it never shows you.

  • Where: under the note's title (Notion-style), under the title with a hairline drawn between the two so the pair reads as one page header, at the very end of the note (1Password-style), or both.
  • Format: relative (3 minutes ago), the exact date and time, or relative followed by the exact date. Click the stamp to see both for that note whatever the setting is, and hover for the exact time either way.
  • Wording stays coarse on purpose (just now, an hour ago, yesterday, 12 days ago) and switches to a plain date past a month, because "37 days ago" is harder to place than "Jun 18". It re-times itself every minute.

It reads the file's own modified time, so it is right with nothing to maintain. In a synced vault that is not always true: a sync client rewrites the modified time when a note arrives from another device, which would make it look freshly edited here. So a note's own updated: (or modified:, or last-edited:) frontmatter property wins where it exists.

Copy as rich text (for email)

Plain Ctrl+C hands a mail client raw Markdown and lets it guess. Outlook autoformats the 1. lines into a list of its own, renumbers every nested level 1, 2, 3 (Markdown writes them all as 1., and the a, b, c you see in Obsidian is CSS, which no clipboard carries), and leaves a hole wherever a line held a non-breaking space.

Ordinary Ctrl+C does this for you (setting: Rich text on copy), and Copy as rich text (command palette, or right-click a selection) does the same on demand, including the whole note when nothing is selected. It renders the selection (or the whole note, if nothing is selected) and puts real HTML on the clipboard, so the receiving app reads a document instead of interpreting text. Nested numbered lists keep their a, b, c and i, ii, iii, spacing is set explicitly rather than left to the client, invisible "blank" lines are dropped, and links, bold, headings, and code survive. Links to other notes become plain text, since a vault path means nothing in an inbox.

The plain-text flavor stays Markdown, so pasting into an editor or a terminal is unchanged. Pasting back into Obsidian gives you the Markdown you copied rather than a reading of the HTML: the copy carries its own source inside it, so wikilinks, callouts, and tasks come home intact.

Toggle blocks: collapse anything

The toggle button (chevron, next to Quote, also a command and a /toggle slash item) folds the block under the cursor behind its first line, Notion-style: the first line becomes the always-visible title, everything else collapses beneath a chevron. Click the same button inside a toggle to unwrap it back to plain text, title first. Under the hood it's a collapsed > [!toggle]- callout (plain markdown that folds natively in Live Preview, Reading view, and on mobile, and degrades to a simple quote without the plugin) styled here as a bare toggle: no colored box, no icon, just the chevron, a bold title, and a rule down the collapsed content.

Links, dialog-style

The link button opens a floating, draggable dialog: Text to display, Address, or pick a note from the searchable vault list to insert a [[wikilink]] that jumps straight there. Put the cursor inside an existing link and the same dialog edits it in place.

Images: click for the toolbar, drag to resize

Click any image in the editor for a floating toolbar right on top of it: align left / center / right, size (original, 25/50/75% presets, or an exact pixel width), alt / caption text, replace with another vault image (searchable picker), and remove. Everything writes Obsidian's own syntax (![[image.png|caption|400]]), nothing proprietary.

Images: drag to resize

Hover any image in editing view and a corner grip appears, drag it and the image resizes live with a pixel badge, then the width is written into the embed (![[shot.png|420]]), so it holds everywhere, on every device.

With Readable line length on, a sized image is not stuck at the text column: keep dragging and it grows to the pane edge, bleeding evenly past both sides of the column (and centered the same way in Reading view). Unsized images keep the normal column fit, and panes too narrow for the written width (phones, tight splits) fall back to fit-to-pane instead of scrolling sideways.

Tables

The table button opens a Word-style grid, sweep to the size you want (up to 8 × 6) and click. Power Tables takes over from there if you want sorting, filters, colors, and totals.

Column widths: hover a column boundary in the header row and drag. The band is grabbable from either side of the divider, the cursor changes, and the edge that will move is highlighted. Widths are written into the note on the header cell, so they travel with the file and degrade to plain text anywhere the plugin is not installed.

This one stands down when Power Tables is installed, which owns table cells and does the same job with auto-fit, a reset command and its own right-click menu. Two plugins listening for drags on the same header cells would fight over every one of them. The widths written here use Power Tables' own encoding, so installing it later finds your columns already sized rather than a second set it cannot read. Editing a width is done in place, so a header cell that already carries a fill or borders keeps them. Live Preview only, since the width has to be written back into the document and a Reading-view table has no editor to write through.

Dictate

Click the mic, talk, click again, your words land at the cursor as a block of text. Point it at any OpenAI-compatible transcription endpoint in settings (Groq, OpenAI, or a self-hosted Whisper server on your own machine, which needs no key). If Power Assistant is installed and you leave those fields empty, dictation borrows its endpoint and key, so a vault running both configures transcription once. Right-click the mic (or use settings) to choose how it lands: raw transcript, tidied prose (filler words and false starts removed), or bullet points, the tidy modes use the AI key and fall back to raw if anything fails.

Format painter

Select formatted text, click the paintbrush, then select the text to paint, the captured combination (bold/italic/underline/strike/highlight/color) is applied in one go.

The brush cycles through three states, so the sticky mode is something you find rather than something you have to be told about:

Click State What happens
once armed (brush lights up) the next selection takes the look, then the brush lets go
twice locked (brush gains a ring) every selection takes it, until you stop
again off the brush lets go

Escape stops it from either state, as does clicking the brush. Coming from Word or Excel, a double-click still goes straight to locked, because two clicks land there anyway.

Copying unformatted text is a normal thing to do: the brush then holds "no formatting", and painting strips bold, italic, highlight and colors off whatever you select next. That is how a few scattered bits of stray markup get tidied without hunting each one down.

Emoji & find

The emoji button opens a searchable picker (type "check", "rocket", "warning"…) with your recently used emoji floating first. The find & replace button summons Obsidian's built-in per-note search and replace, which most people never discover behind Ctrl+H.

Clean paste

Pasting from Word, Outlook, or the web converts to clean Markdown automatically, styles, classes, and Office junk stripped, real structure (headings, lists, links, tables) kept. Tables are rebuilt row by row, so a comparison copied out of ChatGPT, Claude, or Grok lands as a real Markdown table instead of one run-on paragraph, even mid-sentence. When the copied text is already Markdown, that original is used as-is; when a table arrives as tab-separated rows (Claude.ai, Excel, Sheets), those rebuild into a table too. Insert clipboard formats dumps what the clipboard actually holds if a paste ever still comes out wrong. Toggle it off if you prefer raw pasting; the Paste as clean Markdown command is always there.

AI edits

The ✨ menu rewrites the selection in place (Improve writing, Fix grammar & spelling, Make shorter, Summarize) plus your own custom actions (name + instruction, added in settings) and two that need no selection: Continue writing (picks up from what's above the cursor) and Summarize page into bullets. Uses your Anthropic API key, or, if the field is empty, quietly borrows Power Assistant's so you configure one key once. Default model claude-haiku-4-5 (pennies); change it in settings.

Privacy & network use

Power Editor makes network calls only for the two opt-in features that need them, with your own API keys (stored locally in the plugin's settings file inside your vault). No telemetry, no analytics.

  • AI edits: the selected text (or, for Continue writing / Summarize page, text from the current note) plus your instruction is sent to the Anthropic API. No key configured (and no Power Assistant key to borrow) → the AI menu simply reports that and sends nothing.
  • Dictation: the recorded audio clip is uploaded to your transcription endpoint (Groq, OpenAI, or a self-hosted Whisper server on your own machine or LAN, which stays local and needs no key); the tidy/bullets modes then send the transcript to the Anthropic API. With no endpoint set and none to borrow from Power Assistant, the mic button just explains what it needs.

Everything else (formatting, blocks, links, images, tables, paste cleanup) is fully local.

What the catalog's scan reports

The community catalog scans a plugin for what it is capable of, which is not the same as what it does with it. Power Editor reports two things.

What the scan reports What it is Where
Vault enumeration Listing your notes, for the things that have to offer you one: the image picker, the link dialog's file suggestions, and the note pickers behind the block and template actions. Only paths and extensions are looked at, and the list stays inside Obsidian. src/main.ts, the picker and suggestion builders
Clipboard access Reading: two commands you run, Paste as clean Markdown and Insert clipboard formats, which is a troubleshooting command that shows you the flavors on your clipboard. Writing: Copy as rich text, and the copy cleanup below. Nothing reads the clipboard on its own, on a timer, or in the background. src/main.ts clipboardHtml, onCopyOut

One behavior worth stating plainly: Power Editor listens for your own copy and cut, and when the selection contains formatting it rewrites the plain-text flavor of what you copied, so highlighted or colored text does not paste its raw <mark> and <span> source into other apps. It only acts inside the Markdown source view, only when there is a selection, and only when cleaning would actually change something; otherwise Obsidian's own copy runs untouched. Set Copy mode to off and it never fires.

There is no eval, no Function constructor, no code fetched and run at runtime, and no processes started. The plugin's own network calls go through Obsidian's requestUrl. Two fetch calls appear in the built main.js: they belong to the bundled @anthropic-ai/sdk, and they run only when you have an AI key set and use an AI edit.

Settings

Toolbar on/off (and separately on mobile), per-button visibility, selection bubble, block handles, headings-move-sections, clean paste, WYSIWYG mode, line spacing (compact / normal / relaxed), indent guides on numbered lists, space under headings and around tables, dictation mode, transcription endpoint/key/model, AI key, model, and custom AI actions.

Hide indent guides on numbered lists (on by default) drops the vertical rule Obsidian draws down each indent level, for numbered lists only. A bulleted list has nothing else to show how deep an item sits, so it keeps its guide; a numbered list says so twice already, through the numbering and through the a, b, c under it, and the rule reads as a line ruled through your text.

Space under headings and around tables

Markdown puts a blank line under a heading and on both sides of a table, and the table one is not optional, remove it and the table stops being a table. In editing view each of those blank lines is a real editor line taking a full line's height, which is why a heading can sit a long way from the paragraph or table it introduces.

Nothing in Obsidian's spacing variables reaches them: --p-spacing only covers the space above a heading in Live Preview (--p-spacing-empty, the one below, is 0), and --heading-spacing is Reading view only. Two settings shrink exactly those blank lines and nothing else, blank lines between ordinary paragraphs, and after callouts or images, keep their full height:

  • Space under headings, the blank line between a heading and whatever follows it.
  • Space around tables, the blank lines on both sides of a table, plus the table's own bottom padding (which never drops below 6px, so the row drag handles keep their room).

They are independent, because a table usually wants more breathing room than a paragraph does. Where a table follows a heading directly, that one blank line is both things at once; the heading setting wins, so a heading sits the same distance from whatever comes next.

Each has presets from Roomy (18px) through Half (12px, the default) to None, and a box beside the dropdown that takes any value from 0 to 60 for anything in between. The file is untouched either way: the blank line is still there, so the Markdown still parses everywhere else. The cursor looks short while it sits on one of those lines and returns to normal as soon as you type.

Support

Power Editor is built and maintained by one person. If it earns a place in your daily vault, you can buy me a coffee. Nothing in the plugin is held back either way.

HealthExcellent
ReviewPassed
About
Edit Markdown in true WYSIWYG with a floating toolbar, inline selection bubble, block drag handles, dictation and image-resize handles while files stay plain Markdown. Use a cursor-aware toolbar and slash commands that reflect exact formatting and expose every action as a command to preserve plugin compatibility.
EditingFormattingCommands
Details
Current version
1.60.0
Last updated
17 hours ago
Created
3 days ago
Updates
19 releases
Downloads
67
Compatible with
Obsidian 1.8.7+
Platforms
Desktop, Mobile
License
MIT
Report bugRequest featureReport plugin
Author
Power PluginsPower Pluginspowerplugins-dev
GitHubpowerplugins-dev
  1. Community
  2. Plugins
  3. Editing
  4. Power Editor

Related plugins

Sort and Permute lines

Sort and Permute lines in whole file or selection.

Heading Shifter

Easily Shift and Change Markdown headings.

Paste URL into selection

Paste URL "into" selected text.

Keyshots

Add classic hotkey/shortcuts commands from popular IDEs like Visual Studio Code or JetBrains Family.

Vimrc Support

Auto-load a startup file with Vim commands.

List Callouts

Create simple callouts in lists.

Symbols Prettifier

Prettify the symbols with actual symbols you commonly type, like arrows.

Slash Commander

Customize the slash command list, assign each command an icon.

Advanced Tables

Improved table navigation, formatting, and manipulation.

Meta Bind

Make your notes interactive with inline input fields, metadata displays, and buttons.